Sunday School > Crafts > 3 Paper Nativity Crafts
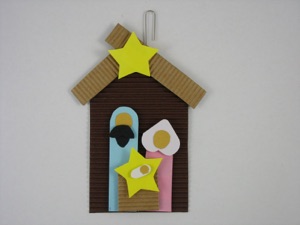
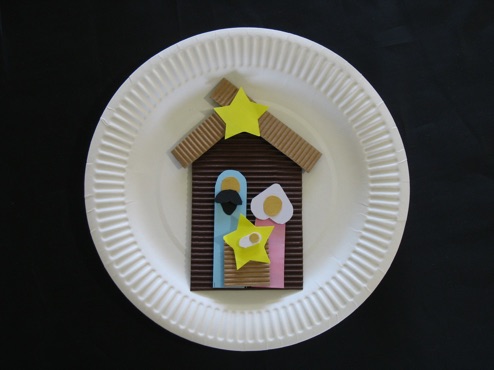
Keep this project simple by making a barn and 3 figures, Mary, Joseph, and Jesus. Used as is, it makes a cute ornament for a Christmas tree, or as a stand alone decoration for a desk. If you glue it to a paper plate, it becomes a simple wreath. A green plate would make it look even more like a wreath. If you want to go all out, you could cut out lots of paper leaves to glue all the way around the rim, and it will look even more like a wreath.
If you want to make one of the projects shown below, make lots of additional figures using the same pattern-- just change the colors, and what they are holding to make shepherds and wise men. But don’t expect children to join in these larger projects--it’s too much work! You can work around this by breaking it up into smaller projects--make Mary and Joseph one day, wise men another day, and sheep and shepherds yet another day. Or divide and conquer--ask each child to make a different figure or set of figures.
With some adaption, you can use the paper version to make most of the crafts that are made from other materials, too. Even the bath toy, shown in the foam section, can be made with paper if you seal each figure between 2 sheets of contact paper, or laminate the pieces.
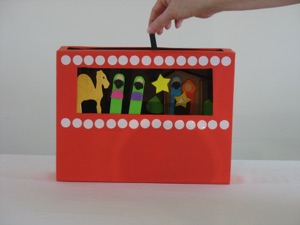
Puppet Stage
Make a cereal box (or any cardboard box) into a puppet stage. Glue the figures to popsicle sticks and move them around from a hole in the back or in the top. Use it for Sunday school, too!
Bulletin Board
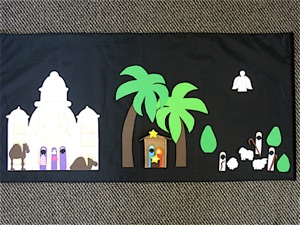
Make a bulletin board with lots of figures, including shepherds and wise men, to depict all of the Christmas scenes. Since most of the stories occurred at night, a black background is perfect.
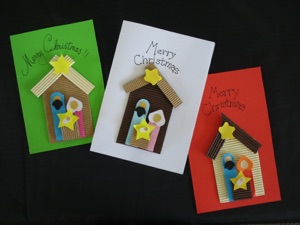
Christmas Cards
Make Christmas cards that can double as a gift--fasten a ribbon to the back of the barn as a Christmas tree ornament, or fold the card into 3 panels as a centerpiece.
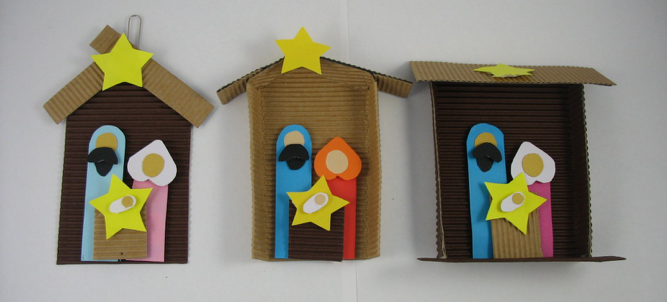
3 Ways to Use the Paper Nativity Figures
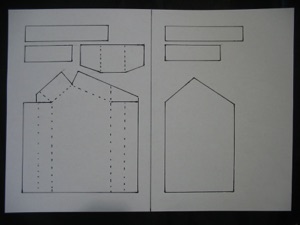
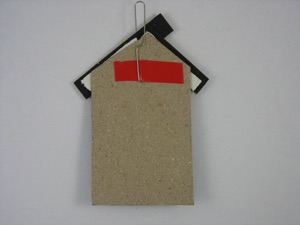
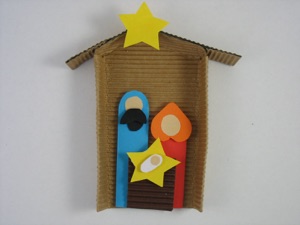
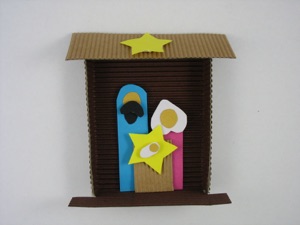
There are 3 different ways to make the barn. The version on the far left is flat, so it good for making Christmas cards. The other two can add depth to a bulletin board or puppet stage. The one on the right is perfect for a stand-up scene to put on a child’s desk or nightstand. For more ideas of how to use these, check out the wooden and foam versions, too.
How to Make the Barn and Figures
How to Make the Figures
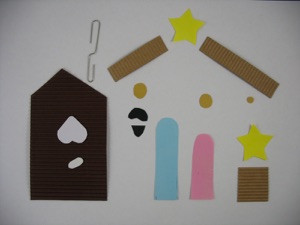
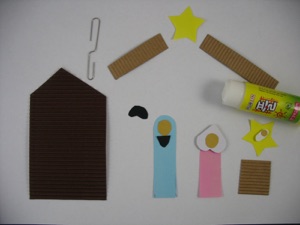
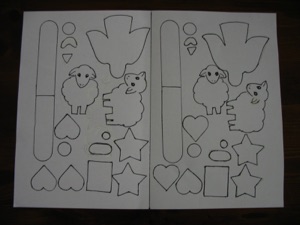
Cut these shapes out of paper. If you want the craft to go more quickly for a class of children, cut out all the shapes ahead of class. Cut 3 sheets of paper together at once to save time. Put all the pieces for each child in paper envelopes or plastic bags. Have extra pieces on hand in case some get lost. Another option is to make stations (see below for more details)
Use glue stick to glue Mary’s headdress on, then glue on all the faces--for Joseph, Mary, and the baby Jesus. Then glue the beard under Joseph’s face, and glue the baby onto the star that represents straw.
The roof, barn, and manger are cut from corrugated paper for texture, but if you can’t find any, flat paper works just as well. The figures work best made out of heavy paper (card stock) but if you can’t buy any, colored paper that is the same weight as copier paper will work.
Hanging options
-
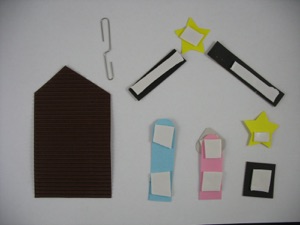
1.Open a paperclip to form a hook and tape it to the back, or glue a small rectangle of fabric to fasten the hook to the back of the barn. OR
-
2.Glue a loop of ribbon to the top of the back. OR
-
3.Punch a hole and tie a loop of thread or ribbon through the hole.
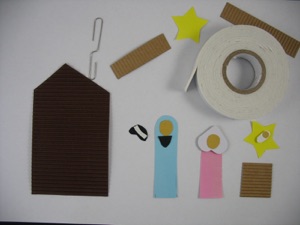
Use foam-style double stick tape to fasten Joseph’s mustache, and the “straw” star onto the manger. If you are making a puppet show or bulletin board, make more figures representing shepherds and wise men. I used white paper for the shepherds and varied colors for the wise men, but you can choose any color you want.
Use foam-style double stick tape to fasten Joseph, Mary, the manger, and the roof onto the barn. Stick the star to the roof. If you are making a puppet stage, skip this step.
Clean gummy foam tape residue with white sponges (“Erasers” is one brand.)
NOTE: When deciding what color to use for the barn, keep the background color in mind. If it is a darker color, such as black or dark green, a darker barn will be difficult to see.
How to Organize the Craft in a Classroom
Organizing a craft for lots of kids that involves lots of little pieces can be a logistical nightmare. One way to reduce the madness is to make one station for each of the 4 parts of this craft, and have an adult to supervise each station. The children move around from station to station to make the different parts of the project. Ask parents to help if you are short handed. If the kids are used to working on their own, you might be able to get away with having 2 stations manned by one adult, floating to where they are needed.
Designate one table, or area on the floor, with the materials needed to make the barn. Put each part in a separate container such as paper plates or shoe box lids--the barn wall, 2 roof pieces, and the star. Optional: a paperclip or ribbon for hanging. You will also need glue stick or double stick tape to fasten the pieces together. Since the double stick tape can be really messy, you may want to have this already fastened to the backs of the pieces, or make sure the adult cuts the pieces of tape for the kids. Provide scissors and white sponges (that have been moistened) for when the scissors get too sticky to cut anymore. Once the barn has been made, any figures that have been made can be fastened to the barn. The kids who start with the barn have a place to put all the figures, but you may want to give each child an envelope with their name on it to carry the figures they have made to each station until they reach the barn station.
The second station could be for making Joseph. This has 4 pieces as well--the body, face, beard, and mustache. To make things easier, the foam style double stick tape could already be fastened to the back of the body and mustache. All the kids have to do is peel the tape and stick it on. You will also need glue stick or double stick tape to fasten the rest of the pieces together.
The third station could be set up for Mary--the body, head scarf and face.
The fourth station could be for making the manger and baby Jesus--manger, star “straw,” swaddling clothes and a face. Be sure to have extra pieces cut out in case pieces get lost or mangled.