Sunday School > Crafts > 3 Wooden Nativity Ornament Crafts
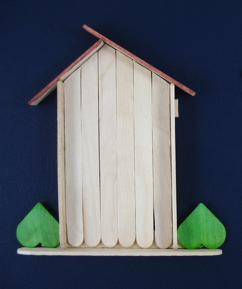
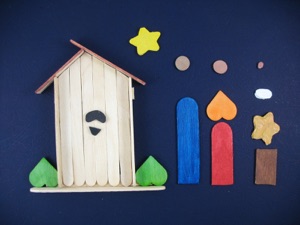
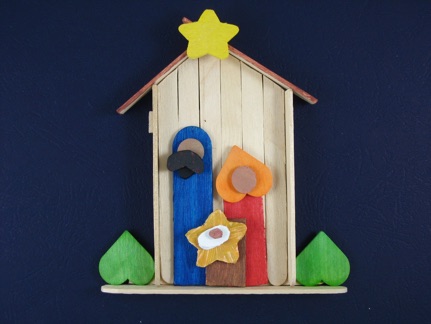
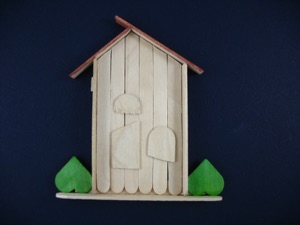
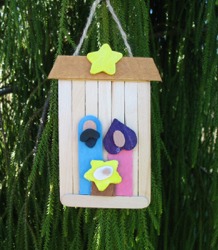
Cute Version
As I was designing this, I realized that there were a lot of popsicle sticks needing to be cut. So I came up with a quicker version for people in a hurry, or who want to use it as a Sunday School project. The quick version on the right uses a shorter size of popsicle sticks so only one stick had to be cut (the roof.) If you have the time, though, this one IS cuter.
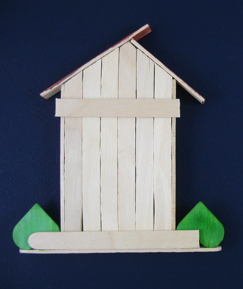
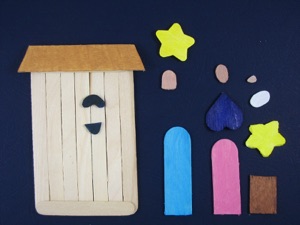
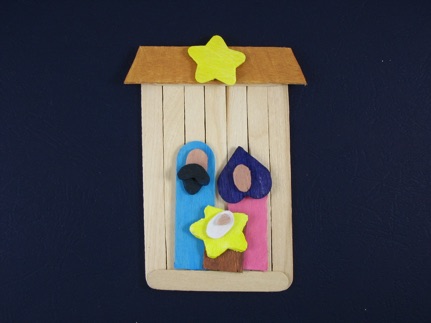
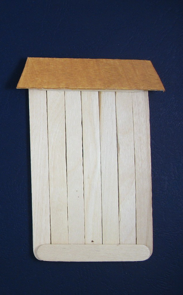
Quick Version
This version is quick only if you can find pre-cut, pre-painted wooden shapes, and 2 lengths of popsicle sticks. If you can’t find pre-cut wooden shapes, you might be able to find pre-cut foam or felt shapes instead. Some craft stores sell packs of shapes, and sometimes Walmart and dollar stores sell them. If you can’t find pre-cut shapes, the only option is to cut your own (obviously the felt or foam will be a lot easier to cut than wood.
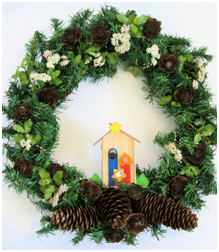
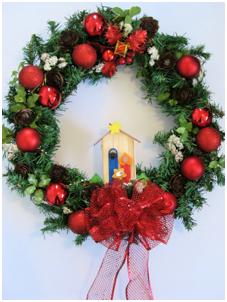
Once you get it made, it can be used in a lot of different ways. Hanging it on a Christmas tree is the most obvious choice. Another option is to fasten it onto a wreath with florist’s wire or a glue gun. Dollar store wreaths are perfect for this. Just pull off the ugly decorations and add this cute one. To see what it looks like on different wreaths, scroll to the bottom of the page.
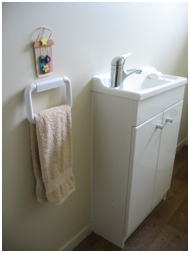
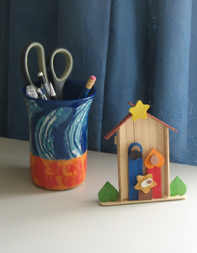
There are lots of places around the house you can decorate with this tiny nativity scene. Since it is a small ornament, try to find a small space to spruce up. You can put the hanging version over a towel rack or light switch. You can put the standing version next to a pencil stand on a desk, or in the bathroom next to the faucet.
Cute Version
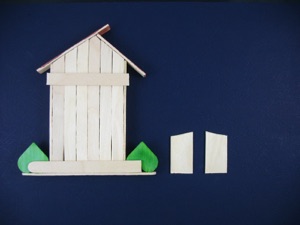
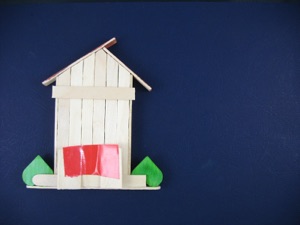
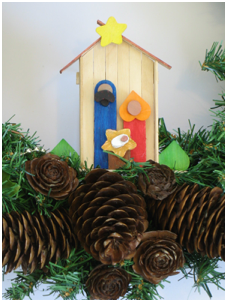
Line up 6 sticks for the back of the barn. Cut or break the tops of these 6 popsicle sticks in the shape of a slanted roof. (see breaking technique below.) I purposely made the peek off-center for the cute factor, but if that drives you crazy, make the peak in the middle! Glue these 6 sticks with 2 crossbars , one toward the top that is the width of the sticks, and a longer one at the bottom to hold the bushes next to the barn. When the glue is dry, flip it over and glue on the 2 bushes, and the floor stick, 2 walls sticks, and 2 roof pieces that have been cut to fit. If you don’t use a glue gun, you may need to use canned goods or tinfoil to prop up the pieces until the glue dries.
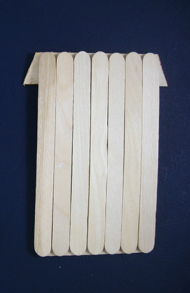
Quick Version
Line up 7 popsicle sticks (or however many it takes to be the same length as the short popsicle sticks.) Use a ruler or book to make sure the 7 sticks line up evenly. Glue on 2 shorter sticks as crossbars to hold all the sticks together--glue one at the bottom, and the other at the top, but this one should be a fraction of an inch away from the top edge (it is hiding under the roof in the photo.) When the roof is glued on top, it will be at a slight angle. See below for how to cut the tongue depressor for the roof. If you can’t get tongue depressors (double wide popsicle sticks) use a regular popsicle stick instead.
Optional: stain or paint the roof.
Note: if you use a glue gun, you are now ready to glue on the figures. If you are using wood glue or white glue, it needs to be left undisturbed until it dries (check the glue container for drying time.)
4 Ways to Use the Wooden Nativity Ornament
How to make the barn
How to make the figures
Back
Front
Back
Front
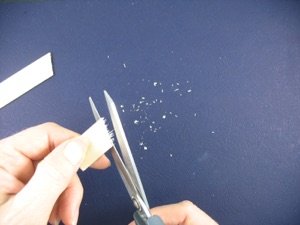
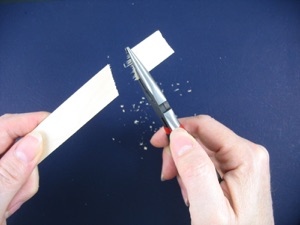
How to break the popsicle sticks and tongue depressors
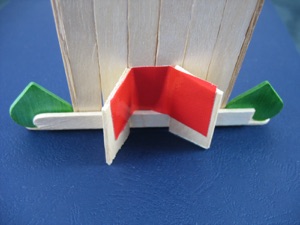
How to make a folding stand on the back of the barn
Even with a saw, cutting a small piece of wood can be complicated. Here is a technique I have developed that I think is easier. Hold a pair of pliers right where you want the cut to be. It can be straight or at an angle. Bend the pliers toward you till you hear a crack, then bend it away from you till you hear a crack.
Bend again, if necessary until it makes a clean break. If you bend it all the way the first time, you can split the wood. You may need to practice on several to get the hang of it.
Trim off the rough edges with scissors.
Optional: sand it for a smoother surface. Since the wood is so small, rub the wood against the sheet of sandpaper rather than rubbing the sandpaper on the wood. Since this is not a fine piece of furniture, so I don’t bother with sanding.
Cut 2 small pieces of tongue depressor. Cut a notch out of each peace to go around the lower crossbar.
Lay them on the back of the barn, but leave a gap of 2 stick’s width between them. Tape them in place, or glue them with a small rectangle of fabric.
Now the stand can be pulled forward to make the barn stand up, or folded flat for storage.
The figures are made the same for both the cute version and the quick version. Make the figures stand out from the back by gluing scraps of popsicle sticks or tongue depressors to the backs of the pieces. Another option is to use foam-style double stick tape.
-
1.Joseph: half a tongue depressor for the body, circle face, point of a star for the beard, 2 points of the star for the mustache ( which are both on the barn since the background was too dark for them to show up) The beard and mustache are so small that you can color them black with a permanent marker instead of paint, if that is easier.
-
2.Mary: the short “half” of the tongue depressor for the body, an upside down heart for the headdress, and a circle for a face
-
3.Baby Jesus: a short section of a tongue depressor for the manger, a star for the straw, an oval for the body, and a tiny oval for a face.
-
4.Star: glue to the roof of the barn
Paint the pieces before gluing them on. If you don’t want to spend the time painting, or if you can’t find pre-cut wooden shapes, you can cut any or all of the pieces out of foam, felt, or paper instead

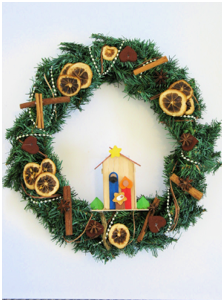
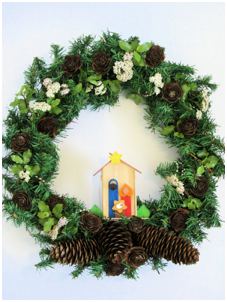
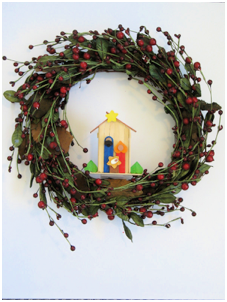
Fasten the nativity set to any purchased or homemade wreath. Push the ends of the wire into the wreath to keep them from scratching the wall, or snagging other decorations.
Berry wreaths can be purchased in most places that sell Christmas wreaths. Plain greenery wreaths are sold in most craft stores during the last half of the year. Plain vine wreaths are sold in craft stores and some dollar stores.
To make a natural wreath, buy a plain artificial wreath. Use a glue gun or florist’s wire to fasten on natural items such as stick cinnamon, star anise, and dried lemon slices. Twist on a string of gold beads for a bit of sparkle, if you like. For another option, instead of dried fruits and spices, make wise men and shepherd figures to scatter around the wreath.
Start with a plain artificial wreath as a base. Use a glue gun or florist’s wire to fasten on large pinecones instead of a bow. Fasten on smaller pinecones around the wreath. Add dried baby’s breath flowers or small artificial flowers and small clumps of artificial leaves.
This wreath also starts with a plain fir wreath. Add Christmas balls and a bow.
view how to make a bow
The great thing about dollar store wreaths is that they are so cheap. Pull off the ugly decorations, and add nice ones--the perfect backdrop for your popsicle nativity scene!
Fasten the wooden nativity to any existing wreath: