Sunday School or Bible Clubs > Seasonal Sunday School Crafts > Christmas Tree or Window ornaments
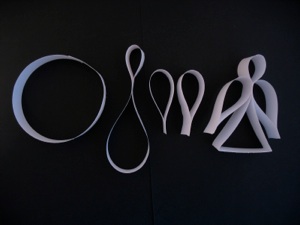
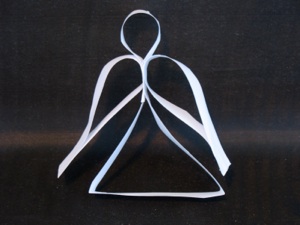
Paper Angel Ornament
for Window or Tree
-
1.Cut 2 strips of paper 11 in. x 3/4 in. (30cm. x 2 cm.) Cut one strip in half.
-
2.Make a loop out of the longest strip by gluing or stapling the ends together.
-
3.Pinch the loop near one end so that the head is formed. Staple or glue in place.
-
4.Make the 2 wings by gluing or stapling the ends of the 2 shorter strips together. They should be tear-drop shapes rather than loops. (see photo below)
-
5.Glue or staple the wings next to the neck, just under the head.
-
6.Pinch or fold the large part of the loop in 2 places so that it looks like a dress.
-
7.Optional: make a strip of a longer piece of paper, glue or staple it into a circle, and hang the angel in the middle of the circle.
-
8.Use a needle and thread to make a loop for hanging.
Note: a paper cutter makes preparation for this craft much faster than scissors, especially if you can cut several sheets at once.
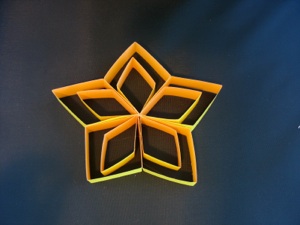
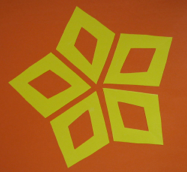
Paper Star Ornament
for Window or Tree
-
1.Cut 5 strips of paper 8 1/2 in x 3/4 in. (21x2 cm.) . Cut 5 more strips of paper that are 6 x 3/4 in. (15 x 2 cm.) .
-
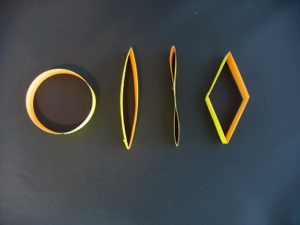
2.Make all 10 strip into a loop by gluing or stapling the ends together.
-
3.Fold all 10 loops flat.
-
4.Open the loops, then put the fold lines together and fold flat again.
-
5.Open all 10 loops that should now be diamond shapes.
-
6.Glue or staple the 5 small diamonds inside the 5 large diamonds.
-
7.Glue or staple the 5 large diamonds together to form a star.
-
8.Use a needle and thread to make a loop for hanging.
Note: if you can’t find paper that is 2 different colors on the two sides, then you can achieve the same result with 2 sheets of different colored paper. However, don’t glue the 2 sheets together since they are likely to buckle when you fold them. Just glue them together when you are forming the loops.
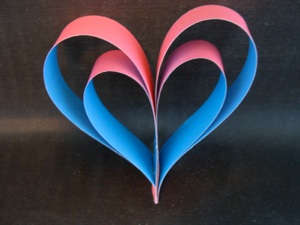
Paper Heart Ornament for Window or Tree
-
1.Cut 2 strips of paper 8 1/2 in x 3/4 in. (21x2 cm.) These measurements don’t have to be exact.
-
1.Cut 2 strips of paper 6 x 3/4 in. (16 x 2 cm.) This doesn’t have to be exact.
-
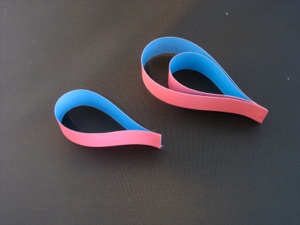
2.Glue or staple the 2 ends of a short strip together to form a teardrop shape.
-
3.Place a long strip over the short strip that has already been made into a teardrop shape and glue or staple the ends in place. (see photo below)
-
4.Repeat steps 2 and 3 with the remaining short and long strip.
-
5.Glue or staple the 2 teardrop shapes so the glued ends are together to form a heart.
-
6.Use a needle and thread to make a loop for hanging.
Paper or Foam Star Puzzle
-
1.Cut a star out of paper or foam.
-
2.Try to put the stars or diamonds into a star shape (diamonds are easier than triangles.)
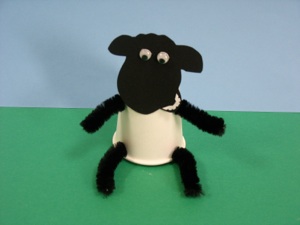
Paper Cup Sheep Craft
-
1.Cut out one sheep’s head out of black paper for each child.
-
2.Poke 4 holes into paper cups--2 near the bottom and 2 near the top of the cup. (a teacher should do this step ahead of class.)
-
3.Poke 4 strips of chenille wire into the 4 holes.
-
4.Use pliers to twist the ends of the wires inside the the cup so the legs don’t come out. (a teacher should do this)
-
5.Glue googley eyes to the face.
-
6.Glue the face to the cup.
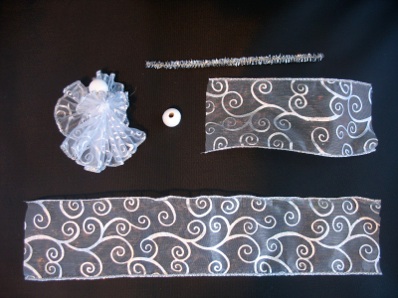


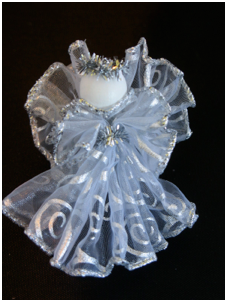
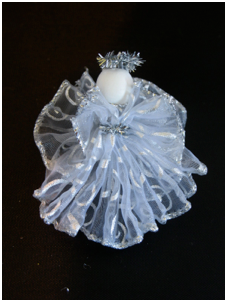
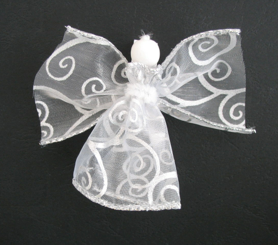
Ribbon Angel Ornament for Window or Tree
materials:
-
1.1 white bead
-
2.2 strips of 2 1/2in. ribbon
(5 1/2 in. and 11 in. long)or
(14 cm. and 28 cm.)
( The ribbon should preferably have wire in the edges)
3. 1 tinsel chenille wire (1/2 may be long enough)
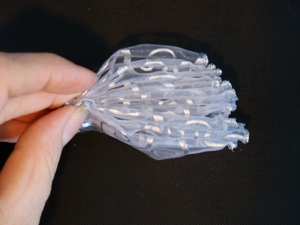
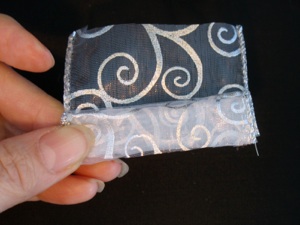
1. Fold the longer strip of ribbon in accordion folds. This will form the dress. Hold the folds in place with a chenille wire “belt” as described in the next step. This 2 1/2in. ribbon is 11 inches long (28 cm.) but a little longer or shorter is fine.
2. Twist the chenille wire around one side of the folded ribbon about one half inch (2 cm.) from the edge. Twist the two ends of the chenille wire around each other 2 or 3 times to fasten the “belt” around the angel dress.
3. Fold the shorter strip of ribbon in the same way--in accordion folds. This will form the wings. (5 1/2 in. or 14 cm.)
4. Twist the 2 ends of the chenille wire around the middle of the “wings” to hold the folds in place. This will form the wings on the back of the angel.
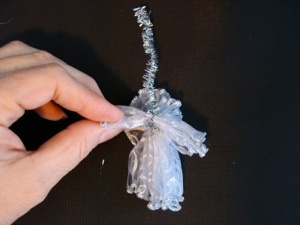
5. Push the bead onto the end of the chenille wire until the head is near the front of the dress.
6. Shape the remaining end of the chenille wire into a halo. Cut off any excess.
-
7.Fluff out the dress and wings.
-
8.Tie a bit of thread or string to the angel to make a loop for hanging.

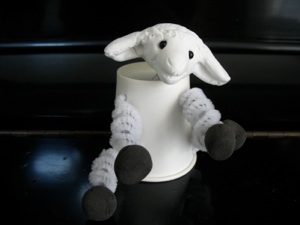
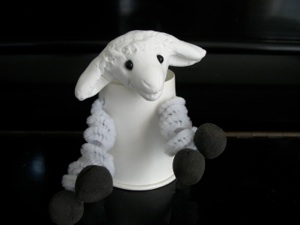
Paper Cup Sheep Craft
-
1.Poke 4 holes into the side of each paper cup for the legs--2 near the bottom and 2 near the top of the cup. Poke 2 holes in the bottom. (a teacher should do this step ahead of class.)
-
2.Poke one half of a chenille wire through the holes in the bottom from the inside to the outside. Twist the ends to keep it from falling back out. This will be the neck.
-
3.Poke one chenille wire through the top holes and another one through the bottom holes. These 4 ends of chenille wire will be the 4 legs.
-
4.Wrap each leg around a pencil to form a coil. Remove the pencil.
-
5.Make 4 hoofs out of Model Magic or home made soda dough. Press them onto the ends of all 4 legs.
-
6.Make a head out of model magic or home made soda dough: Make a ball, cut ears with scissors--use a toothpick to indent the ears. Shape the nose and ears with your fingers. Press a mouth and nose with a toothpick. Press a toothbrush into the clay to make it look like wool. Press the head onto the ends of the neck wire--GENTLY so the face is not smashed out of shape.
-
7.Press beads into the face for eyes. Let the clay air dry.
wings
dress
wings
dress
Simpler version
Leaving out the accordion folds makes this version supper quick and less expensive since it hardly uses any ribbon. It’s also easier to make for younger kids, or kids who aren’t so good at making things.
This ribbon is 2 1/2 inches wide (6cm.).
-
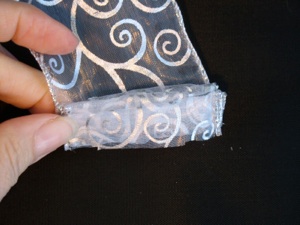
1.Cut the dress 4 1/2 inches long (12 cm.)
-
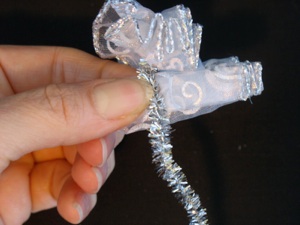
2.Roll this dress into a ring. Scrunch one side, and twist a chenille wire around it for a belt.
-
3.Cut the wings 4 inches long (10 cm.).
-
4.Twist the rest of the chenille wire around the middle of the wing.
-
5.Push a bead on the end of the chenille wire for the head. Cut off any excess chenille wire, or bend it into a hook for hanging. You may need to bend the head around until it is in the right place to look like a head.
These measurements do not have to be exact--a little longer or shorter will work fine (but not much shorter, since it is already so short!)
Note: These measurements do not have to be exact--a little longer or shorter will work fine.
Note #2: This version is white and silver, but kids prefer bright colors. So if you prefer red ribbon, use it!
If all that sounds too complicated, try this--cut all 4 strips the same length--(approximately 21x2 cm.) Then hold two strips together on the ends. Pull on the middle one to make it shorter, and cut off the excess. Glue or staple the ends. Repeat with the other 2 strips. Glue or staple the two narrow ends together to form a heart.
Sunday School or Bible Clubs > Seasonal Sunday School Crafts > Paper Nativity Crafts