Seasons > Easter > Activities for the Home > Easter crafts and decorations to make > Tips for using air drying clay

Attaching Parts:
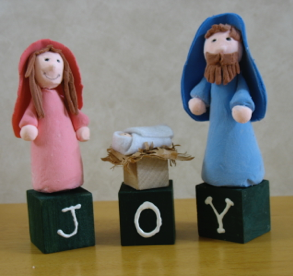
If you are making objects with more than one piece, rub a little water onto the place you want to join, and gently twist them back and forth as you press them together, to get the clay to mix and form a better bond. For some reason, heads tend to fall off even if you do this, so poking a toothpick through the head and into the body can keep the head from falling off later. As an alternative way to keep the head from falling off, you can make the body and head from one piece (which doesn’t work if you are using different colors of clay as in the figures above, but would work for bears or snowmen.)
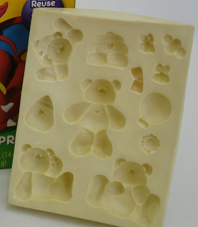
These bears were pressed into a silicone mold sold at craft stores

What it is:
I love this light weight air-drying clay. I use it in so many projects, for just about every holiday (see samples below)!! It is very light weight, so it is perfect for seasonal decorations to hang on wreaths or a Christmas tree--it doesn’t weigh down the branches like heavy resin or Sculpy decorations do. It is also very tough so you don’t have to worry about dropping it when you are putting up the decorations, or if they get knocked off the tree, wreath, etc.
There are several brands of this clay, including “Hearty” and “Model Magic.” Although many craft stores sell a large array of different kinds of clay, there are not very many light weight varieties. The kind I recommend is very light weight and air dries.
Where to get it:
The Model Magic shown on the left, that includes 6 colors, was purchased at Walmart. (cookie cutters and mold are not included.)
Craft stores also sell lightweight clays. I was surprised to discover how expensive one brand, “Hearty,” is--$10 for 250 grams. At least one of the brands sold in the children’s craft section, such as Model Magic, it is quite a bit cheaper. If you buy a large tub, it can be cheaper, too. Hobby Lobby sells a 2 pound tub for $20. If a big tub looks like too much, share with a friend, or invite your children’s friends over to work on a project. I do not recommend the heavier clays, such as Sculpy, for these projects.
Other tools
Look for things around the house or dollar store, such as a garlic press to make hair, fur, grass, lion main, etc.Don’t buy an expensive rolling pin--use a toy rolling pin or a piece of dowel. Toothpicks are useful for drawing fine details, poking holes, and cutting. Since water is used for attaching pieces, it is helpful to keep a small container nearby that won’t make a mess if it spills--a coke bottle cap is perfect. A small paper cup works, too--just don’t fill it to the top.
All kinds of molds, extruders, and tools for working with clay are sold in craft stores. Tools for making fondant decorations for cakes might be useful for making things out of clay as well. All these gadgets can get expensive, so you may want to work with the clay without any tools at first, before you invest--that way you have a better idea of what you will need.
Rolling it out:
When you roll out clay with a rolling pin, it is easy to end up thick on one side and thin on the other. To roll clay out to a uniform thickness, use 2 pencils, or any 2 objects that are the same thickness that you desire, and put them on either side of the clay, then roll out the clay.
Large flat objects tend to warp a little as they dry, so I like to leave them on the surface they are rolled out on till they dry. If you decide to do this, pull away the excess clay, and leave the project stuck to the surface to dry. Once it dries, you have to kind of pry it off, but it is that sticking-to-the-flat-surface quality that keeps it from curling as it dries. Smaller objects don’t seem to warp.
Designs and textures:
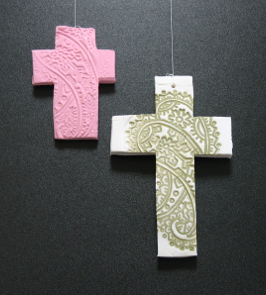
Stamps are an easy way to add texture to a project. If you stamp without ink, it looks like the pink cross shown above, and if you stamp with ink, it looks like the green and white cross. Be sure to wash the stamp thoroughly so the clay doesn’t dry in the grooves of the stamp. If the clay is so sticky that it fills the grooves of the stamp, wash off the stamp, let the clay dry a few minutes, re-roll the clay, and stamp it again.
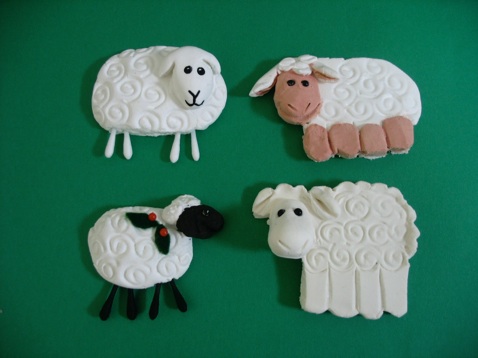
Stamps are not the only way to add designs. Look around your house for design elements or textures to press into the clay, or part of the clay. Use an old toothbrush to make a lamb’s wool bumpy.
Shiny Final Coat:
If you want the project to be shiny, or if you want to protect it from water splashes, paint the dried project with one or more layers of water soluble lacquer or varnish, letting it dry between layers.
Drying:
This clay dries out quite quickly, so always keep the portions you are not using in a zip-lock bag. It also tends to melt if too much water is added. So if the clay you are working with dries out, kneed in a little water. If it gets too sticky, let it dry a few minutes (or hours, if need be.)
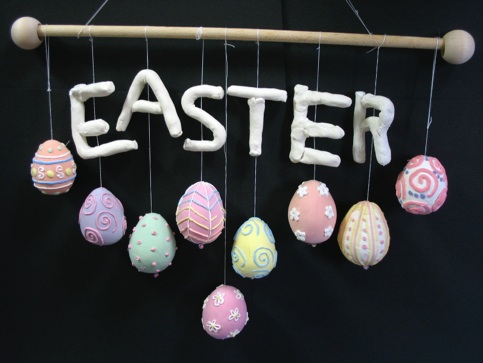
Once the project is finished, let it dry till hard. Small objects dry in a day or two, but thick objects, like Easter eggs, can take a week.
If unused clay completely dries out, it can be re-hydrated. Put it in a zip-lock bag with a small amount of water and let it sit a few days. If you break it into pieces, it will soak up the water better. Once a day or so, kneed the water into the clay. Add water if still has hard parts. If you persevere, it will get soft, and you will be able to use it for a project.
Color:
The easiest way to add color to a project is to start with colored clay. If you have black, white, and 3 primary colors (red, blue, and yellow) you can mix all the other colors.
If you can’t buy colored clay, or if you are buying only white to save money, you can kneed in food coloring to the clay. I am not sure if these colors will fade over time.
You can paint it once the project has dried, but it can be tricky to not get paint on adjacent parts. Acrylic paints tend to chip off fairly easily, so I recommend water colors--inexpensive children’s sets work fine. Be sure wipe the brush of excess paint before you touch the project, as too much liquid can “melt” fine details on the project.
Walmart
Hobby Lobby
Home Made Clay:
If you can’t find this kind of clay locally, here is a recipe for air drying clay you can make in your kitchen. It is not as sturdy as the clay described on the left, so if you drop it, it may break. However, I have never had trouble with mold or bugs eating it as I have with clay made from flour. You can make it into quite delicate objects, such as roses.
1 c. cornstarch
1 1/2 c. baking soda
1 c. cold water
Put the ingredients in a saucepan and mix over low heat until they become the consistency of mashed potatoes. Remove from heat and cool. Keep in a zip-lock bag or air tight container until you make it into a project. You can add food coloring to the dough, or paint it once it is dry.
Cutting with cookie cutters or a straight edge:
Once the clay has been rolled out, cookie cutters can be used to cut out shapes. Coke bottle caps can be used to cut small circles such as buttons. Plastic drinking straws can cut holes for design elements as well as holes for stringing ribbons.
To cut a straight edge, use a ruler and a knife that is not serrated To make sure right angles are straight, use two sides of a book as your guide. To cut a wavy line, use a wavy edged rotary pastry cutter.

Cutting with scissors:
Scissors are another easy way to cut out shapes. Roll the clay very thin, then use scissors to cut strips to form a bow or scarf for snowmen--cut a fringe on the ends, too. These extra thin pieces are fragile once they dry, so it is better if they are attached to thicker pieces before they dry. Scrapbooking scissors or pinking sheers can be used, too, such as for making carnations, etc. This thin clay needs to be just the right consistency to work with. If it is too dry, it will be brittle and crack when you try to shape it. If it is too wet and sticky, it is hard to pull it off the surface without tearing or stretching it. If it is too dry, wet your hand and kneed in the dampness. Repeat until it is easy to work with. If it is too wet, kneed for a few minutes without water, to help it dry out uniformly.
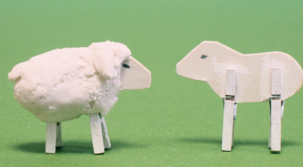
Legs
Animals are hard to make stand up because it is hard to make all 4 legs the same length. One way to do this is to get tiny clothespins (sold at craft stores) and clip them to a cardboard body. Then use clay to fill out the body, ears, tail, etc. Another way to do it is to make a mark on 4 toothpicks and cover the toothpicks with clay up to that mark. Then push the 4 toothpicks into the clay body up to the clay coating. A third option is to make the animals lying down. For people, make the clothing floor length or make the people sitting on something.
Use Q-tips to make legs. Use black beads to make eyes. Use pliers to bend a paper clip into a spiral to make the sheep look wooly.
Once items have dried, a needle and thread can easily poke through the middle to hang them. Just make sure the needle is longer than the object. You may need pliers to finish pulling it through.
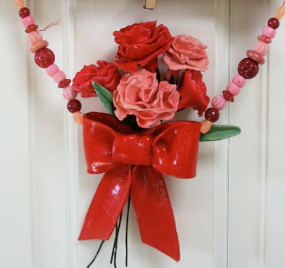
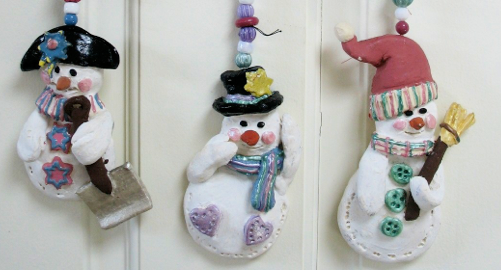
Adding details make the items more interesting: hats, scarves, buttons, broom, and shovel. The more details, the harder it is to spot mistakes.
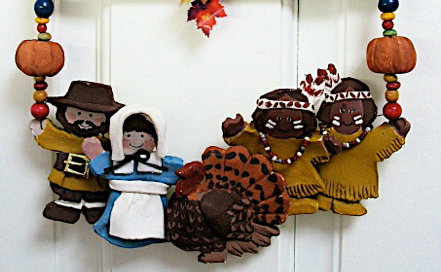
Adding details to cookie cutter shapes makes them look 3-D: a tiny buckle, hat, bonnet, apron, turkey head, beads and pumpkins.
+
+
+
+
=
=
=
+
+
+
+
=
=
=
Mixing Clay Colors:
=
Mixing Pastel Colors: