


Seasons > Christmas > Activities for the home: Fun Ways to Celebrate Christmas > 8 Ways to Make an Advent Calendar

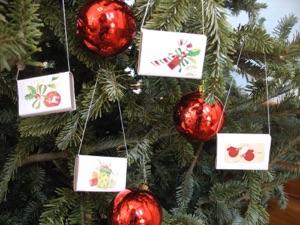
Here are 3 ideas for putting an advent calendar right on the Christmas tree. Go ahead and put the regular decoration on the tree, but then add 24 treats to count down till the 25th. These presents are actually empty match boxes that have white paper wrapped around them, then decorated with Christmas stickers. Wrapping paper would work, too.
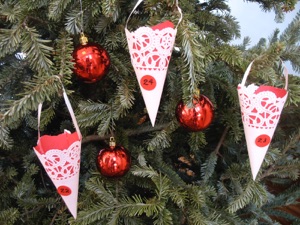
These paper cones are made with paper doilies and red paper cut into half circles and rolled into cones. Glue or staple them. Use poster board to make them last longer. Curling ribbon make good handles--glue or staple them on 2 sides, or punch 2 holes and tie the ribbon in place.
These little packets are actually toilet paper tubes cut in half, or paper towel tubes, if you prefer. Glue on wrapping paper, then squeeze the 2 open ends to close the little pockets. Let younger children pick them in any order, but for older children, number the packets so they have to work a little harder to find the right one, and will also see how many days are left till Christmas.
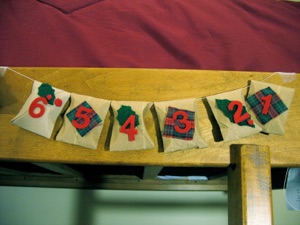
These little parcels bring a new treat each day. Just like the wrapped presents above, cut toilet paper tubes in half (or paper towel tubes) and squeeze the open ends to make flaps to close them. String them on thread, ribbon, or string, and add numbers. The numbers shown here are felt self-sticking, but they can be written with markers. These embellished with alternating squares of plaid cloth and a felt holly leaf and berries--if each child has a different pattern, there will be less argument about whose turn it is.
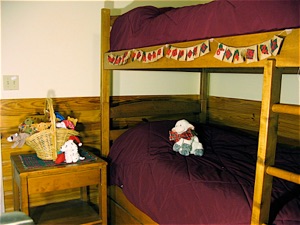
This advent calendar can be strung across a bunk bed, but if your child can’t be trusted, find a more public place to string them, such as on a door frame or refrigerator, or in the back seat of the car. Another option is to tie them onto a wreath. Or cut the string into 4 shorter strands, and fasten them onto poster board to look more like a standard calendar.
You can fill each one with a candy treat, but there are other options--write a clue for where to find a treat, write a Christmas riddle to solve, or write an activity, such as making Christmas cookies, reading a Christmas story, decorating the Christmas tree, driving to look at lights after dark, or listening to Christmas music.
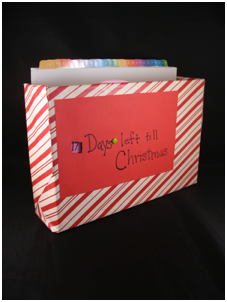
This advent calendar has 2 aspects to it--there is a wheel on the front to turn to keep track of the days till Christmas. Then there are 24 files in the box to provide fun things for your children to do each day. You can have separate activities for them if their ages are not close, and since they must not look ahead, you can change the activities around if you need to. Cover a box with wrapping paper. This one is just an empty cereal box. If you want it to last a long time, though, you might want to use a sturdier box.
Cut a window in the box, and fasten a paper plate to the inside with a brad. The top should just show enough over the top that you can turn it to the next number. (see photo above, left--the plate is pink.) You may need to cut the rim off the plate to make it lie close enough to fasten it with a brad. You could use a circle of poster board instead the plate. Write a number in the window, and keep turning the plate and writing numbers until you get down to one (or zero.) If you would rather spend money than time, buy an accordion folder instead. Buy 24 folders, or make them out of construction paper folded in half. Mark each one with a number from 24 down to one (or zero.) Each day your children will take turns turning the wheel for the Christmas countdown, then pulling out the folder to discover a fun Christmas activity to do. The empty folder can go in the back of the other folders, or, if you think your children might get confused, you can put it in another place until the Christmas season is over.
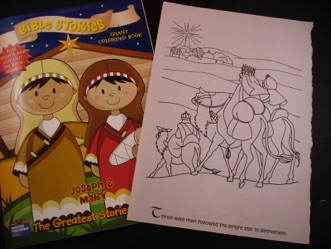
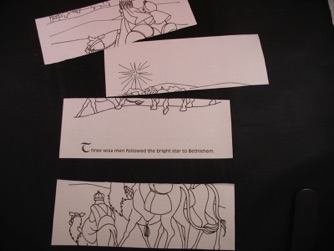
Fill each folder with something for your children to do. One folder could have candy canes to eat, another day could have a CD or DVD to watch or listen to, another could have an easy craft project. If your child likes to color in pictures, you could buy an inexpensive coloring book, and tear out pages to put in many of the folders. You can create more activities by cutting some of the coloring pages into puzzles, or drawing watches, clocks, phones, etc. onto the pictures to see if your kids can spot what was not used during the time of Jesus. The coloring book above was purchased at a dollar store, but I had to go to 3 different stores before I found one! Don’t be fooled by the cover--even if it is ugly, take a look at the drawings inside. Often the cover illustrator is different from the one who did the drawings in the book itself. Christian bookstores will have a bigger selection, and their activity books will have a greater variety of activities to do, like puzzles or mazes.
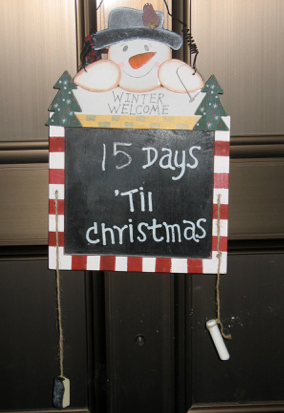
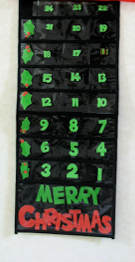
Make a count down board for your kids to mark the days left till Christmas. Put it on the front door, or on the refrigerator--where ever your kids will see it, so they will remember to write the new number before they head off to school.
I bought this one at a dollar store, but it didn’t look like this when I bought it. The chalkboard only had a plain white border, but I could see the potential, especially since it came with chalk and an eraser on strings. I bought the snowman decoration at the dollar store, too, and glued it to the top, then I painted some red stripes around the frame to make it look more Christmasy.
Use what ever you can find--chalk board, whiteboard, or a pad of paper to tear off each number to reveal the next number. Then decorate it to fit the season. If you can’t find any of these products locally, you might be able to find blackboard paint or whiteboard stickers sheets.
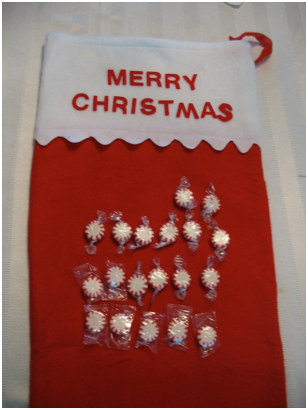
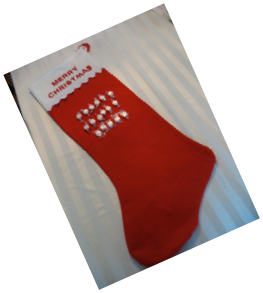
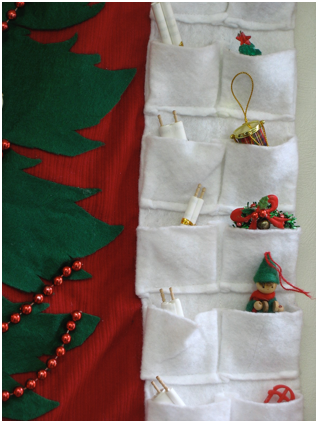
Make a candy count down. This one is a felt stocking from a dollar store. Sew short lengths of ribbon to tie on each piece of candy, or do it the lazy man’s way and just stick the candy on with double stick tape. The base doesn’t have to be a stocking--it could be any Christmas shape--a star, bell, wreath, etc. It doesn’t have to be felt, either--it can be made of poster board, cardboard, plastic or even wood. Sometimes dollar stores sell advent calendars with pockets already made, so all you have to do is fill the pockets with candy. If the pockets can only hold one piece in each pocket, your kids will have to take turns, or you will need to buy one set of pockets for each child. If your dollar store doesn’t have anything that will work, don’t give up--keep looking. You might find something that isn’t made to be an advent calendar, but has pockets. The pockets shown on the far left were made for keeping track of taking pills. I added the numbers, holly leaves and words. Of course, you sew, you can make your own stocking or pockets.
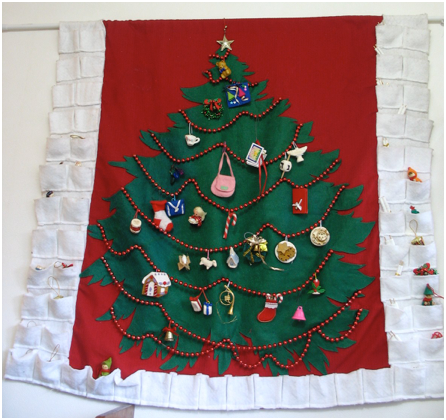
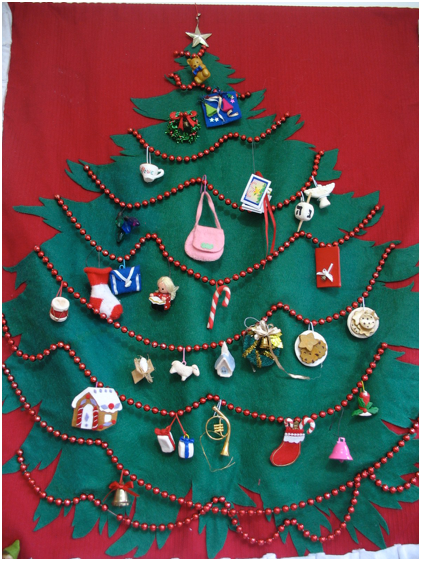
The ornaments on this tree-shaped advent calendar actually announce to the kids which Christmas activity will be done that day--the gingerbread house lets the kids know they will make a gingerbread house, the tree stands for the day to decorate the Christmas tree, the candy cane represents the day to eat candy canes, etc. There are 2 pockets for each day--one for the ornament of the day, and another one for a verse to read with part of the Christmas story when they are young, and Old Testament prophecy about jesus for when they grow older. The verses were written on pieces of paper that were rolled around toothpicks to make mini scrolls. The row of pockets across the bottom were for after Christmas to make sure thank you letters get written and mailed. This advent calendar takes quite a bit of time to make, but it lasts for years. This is the advent calendar that my kids grew up on, so it has lots of happy memories for our family. I kept intending to write the count down numbers on the ornament pockets and a holly garland on the verse pockets, but never got around to it. We used the count down chalk board, so we managed without them!
Use felt to make the tree and pockets so you don’t have to worry about raveling edges, but make the background out of regular fabric rather than felt because felt tends to stretch and sag over time. Hem the edges, and sew a sleeve or channel at the top to put a dowel through to hang the banner. This can all be done with fabric glue, but it is easier to sew, that is, if you have a sewing machine. Hand sew strings of beads to the tree to hang the decorations from. You don’t have to make pockets if that seems like too much work--you can just keep the ornaments in a box, and hand one ornament to be hung each day. Collect small toys and ornaments to hang on the tree, or make them from felt or clay such as model magic. Glue plastic coated paper clips to the ornaments to hang them from the beads.
Seasons > Christmas > Decorations for the home > 8 Ways to Make an Advent Calendar