


Seasons > Easter > Activities for the Home > DIY Resurrection Egg Sets
Many people use an advent calendar to count down the days till Christmas. Most people don’t do that for Easter, even though it would be a great way to help children anticipate Easter. It allows them to learn the fairly long story that has lots of twists in the plot. Resurrection egg sets can easily be adapted as a count down till Easter. Put these items in plastic Easter eggs, then let your child open one each day leading up to Easter. Tell or read the part of the story that goes with that item. (After several years, your children will be able tell the story as they open the eggs.) After each egg is opened, put that item on the church shelf as a decoration for Easter, sort of like an advent calendar used at Christmas. The closer it gets to Easter, the more decorations will be on the shelf. As a fun grand finale, put candy in the empty eggs Easter morning, and let your children have an Easter egg hunt. Finally, retell the story as you refill the eggs with the objects. Then put them away for next year so all the little parts don’t get lost or broken.
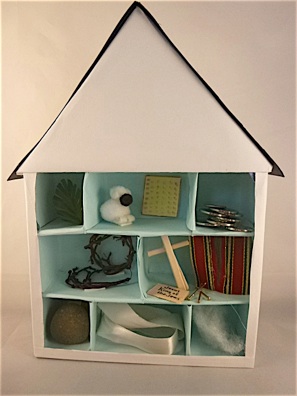
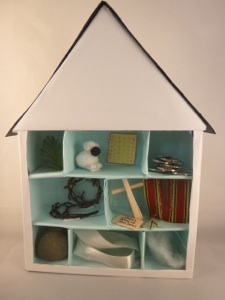
Resurrection egg sets are sold in many Christian book stores as well as on-line. You can fairly easily make your own set using recycled materials and found objects. OPTIONAL: make a shelf to display the objects for an Easter decoration, and Easter countdown.
view expanded version of resurrection eggs with 24 items, and with Bible references
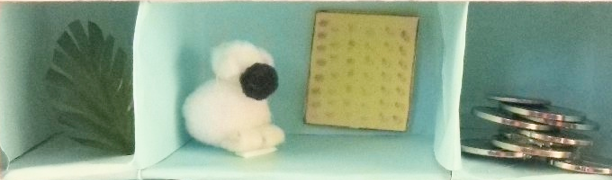
1. Palm leaf (Jesus’ triumphal entry): cut notches or “V’s” in the sides of an artificial leaf, such as bamboo leaf fronds sold at dollar stores. Alternative: cut a palm leaf shape from green paper. Fold down the middle to make vein.
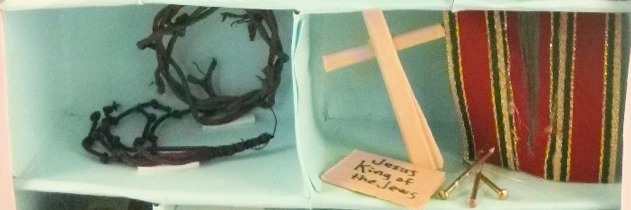
5. Crown of thorns (Jesus’ trial): Make a crown of thorns by twisting small branches of pyracantha or primrose into a ring. Make sure it is small enough to fit inside your eggs. Alternative #1: twist brown coated wire into a ring. Alternative # 2: buy a dozen crown of thorn pins from Oriental Trading Company and share 11 of them with your friends.
6. Scourge/whip (jesus’ trial): Cut 3 lengths of cord or leather, about 6 inches long. Fold them all together in half. Wrap the folded end with thread to form a handle. Keep winding the thread around a half an inch and tie knots to finish. Tie each of the six loose ends of the whip with 2-3 knots.
2. Lamb (last supper): make a lamb from pompoms:
view step-by-step instructions
Alternative: buy a dozen tiny resin sheep from Oriental Trading company. Use the extras for Easter decorations, or share with friends.
3. Unleavened bread (last supper): use a real cracker that your children can eat, or cut small squares out of craft foam and prick rows of holes with a toothpick to make matzo.
4. 30 silver coins (Judas’ betrayal): use 30 silver coins--empty your change purse, then return after Easter. Alternative: spray paint 30 small rocks silver.
Twelve or thirteen items to fill Resurrection Eggs
1
2
3
4
7. Cross (Jesus’ death): Pick up sticks off the ground, or use chopsticks or toothpicks. Cut the pieces to fit inside the egg, then glue or tie the cross piece to the vertical piece with string.
-
8.Sign: Write, “Jesus, King of the Jews” on a small piece of cardboard or wood.
-
9.3 Nails: buy from a hardware store or dollar store (make sure they are small enough to fit inside the eggs.)
-
10. Temple Curtain: Cut a small square of fabric, and tear it in the middle from top to almost bottom. Alternative: use a wide ribbon or two narrow ribbons, cut to fit the shelf.
6
5
7
10
8
9
11
12
13
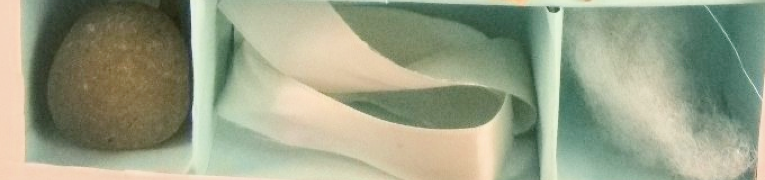
11. Stone (Jesus’ resurrection): Find a flat round stone on the ground. Alternative #1: buy a bag of stones at a dollar store or garden center. Alternative #2: make a “stone” out of self hardening clay. Alternative #3: make it out of bread dough, and bake till hard. Alternative #4: Ball up a sheet of newspaper, get it wet, and squeeze tight into a flat disc. Let dry.
12. White cloth: (Jesus’ resurrection): White ribbon, narrow strips of white cloth, or gauze. You may find what you need right in your own house, such as an old sheet or pillowcase, or even a shirt that is torn, and you plan to throw away.
12. White cloud: (Jesus’ ascension): Cotton from new vitamin jars, cotton balls from drug stores, or batting from a fabric store or a seamstress friend
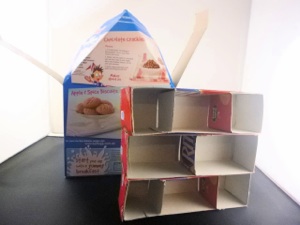
How to Make a “Church” Shelf

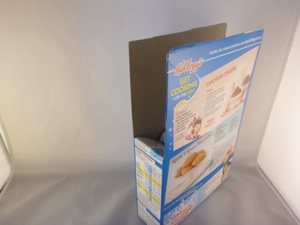
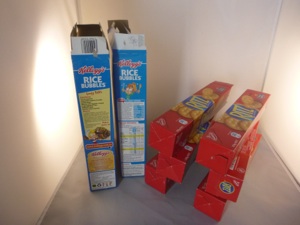
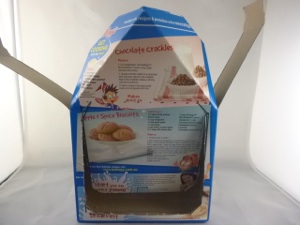

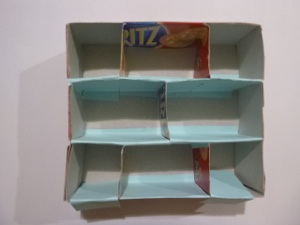

If possible, find cracker boxes, or tinfoil boxes that fit inside cereal boxes. The length of the smaller boxes doesn’t matter as much--they can be easily cut to fit. The important dimension is the width--it should slide easily into the cereal box, but not rattle around inside. It may fit one way, and not the other--so rotate it to see which side is the best fit.
Cut off the top flaps on the front and back of the cereal box, but leave the sides as long as possible.
WARNING: let your children handle these only under supervision to make sure they last a long time. I gave this set to a family with a toddler and older child who were allowed to play with them at will. Soon all the parts were lost, and the “church” was being used for a toy parking garaged. Now they have no resurrection egg objects to celebrate Easter.
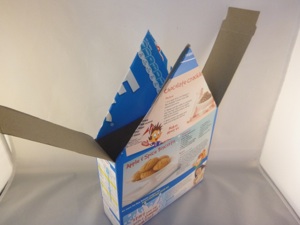
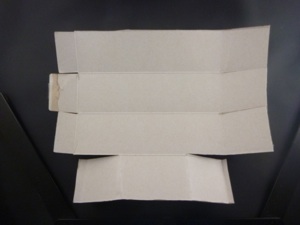
Cut all the corners down to the same height. If the heights vary, the church will end up crooked. Fold the sides into the box to make a firm crease, then pull them out again.
Measure the middle of the front side. An easy way to do this is to fold the cut-off flap in half, and hold it up to the box to mark the middle. Fold the top corners down as far as the cut on the side will allow.
Fold the back side in the same way. If the folded corner flaps are wider than the box, unfold them one at a time, and cut the points off of the corner to fit the width of the box.
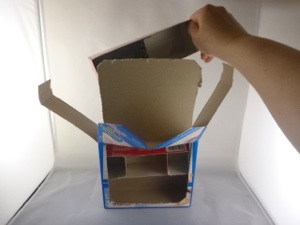
Eventually the top half of the sides will be glued to the corner flaps that will form the roof, but for now, leave them open so the shelves can be inserted.
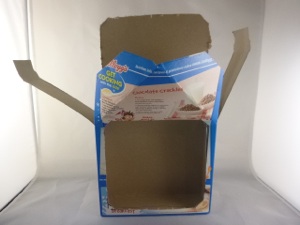
Cut a “window” in the front of the box to showcase the shelves inside. Be sure to leave a quarter of an inch around the sides and bottom to keep the box sturdy. Cut the corners at an angle.
You will need 3 or more smaller boxes to fit inside a large box, depending on box sizes. Small boxes can be cracker boxes, tinfoil boxes, etc. Plastic wrap boxes are usually too beat up by the time you throw them away.
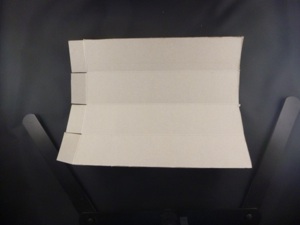
Pull the box apart on the glued seams. Cut off one end so they fit in the larger box, but cut it longer than the width of the big box so there will be enough to make flaps to fold on the end. NOTE: If you can’t find boxes to fit, cut the front and back off of extra cereal boxes (not the church shaped one!!) and fold 4 sections, each the same width as the inside of the church box.
Cut along the 3 folds of the cut end, the same as the width of the box. To make the shelf with 3 sections, cut bottom section along the bottom fold as shown above. Be sure to fold a flap on each end to glue to the bottom of the shelf. For the box with 2 cubby holes, cut the bottom fold to the middle, but NOT all the way through. Fold the two ends flat against each other.
Fold it back into the box shape, except now the 4th side will form the divider walls. Fold all the end flaps overlapping each other, and glue in place (a glue gun works well for this. Otherwise, hold in place with clothespins till the glue dries.) Next glue the divider sections in place on the bottoms of the folded section.
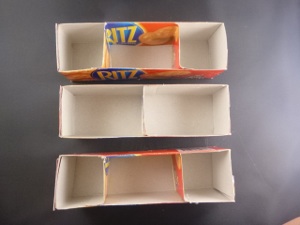
Fold the flap that forms the window at the top of the cut, and fold to the inside. Cut off the extra cardboard from the window flap.
Test each section to make sure it fits inside the box. Trim any places that are too wide.
Pull out the sections and glue the 3 shelves together. Cover the outside of the church with white copier paper. Glue-stick works.
Cut strips of paper to glue on the bottoms and tops of the shelves. Cut slits where the dividers are.
Repeat with all sections.
Cut paper to fit the walls of each section and glue in place. Slide the shelves inside the church. Glue the top of the box together.
Sometimes you can find wooden house-shaped shelves at dollar stores, craft stores, or discount stores. If not, make your own out of recycled materials! If you teach your children to take care of things, this shelf should last for years, even though it is made out of cardboard.


WARNING: These are made of small parts, so do not let toddlers play with them. If you have bigger children that can handle these items, be sure to instruct them to keep them out of reach of their younger siblings.
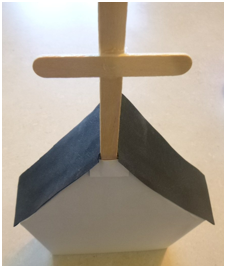
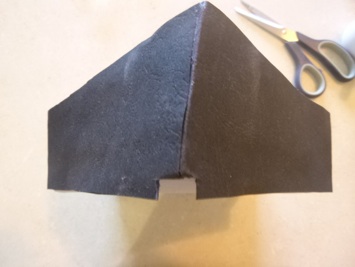
Cut a roof out of stiff black paper such as poster board. Alternative: make the roof out of another cereal box and paint it black. Making the roof a little wider than the building so there is an overhang does make it look more realistic, though it will make storage a bit harder. If you do make an overhang in the back, cut a notch for the cross.
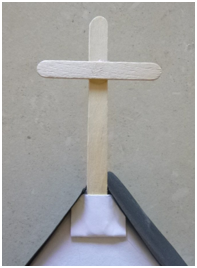
Make a cross out of 2 popsicle sticks, or cut a cross out of thin cardboard. if your cardboard is too floppy, glue two sheets of cardboard together, then cut out the cross. This will make it stiffer.
It is hard to store a church with a cross sticking up above the roof. Make the cross removable with a paper “pocket.” Fold a small piece of stiff paper in half. Cut it to fit the roof. Glue the sides, then glue it to the back of the church. Test the cross before the glue dries to make sure it fits. Take the cross out until the glue dries so it doesn’t get stuck.
Note: If you store your eggs in an egg carton, it is easier to keep them in the right order. If you do that, what can you do with the 13th item when there are only 12 spaces for eggs in the carton? Simply put 2 things together in one egg, such as the crown of thorns with the whip, or the nails with the sign.
NOTE: The back of an old greeting card is just right for making this pocket.


cut
cut
cut
cut


