Amy’s Free Ideas


Seasons > Christmas > Decorations for the home > “Merry Christmas” Paper Swag Sign


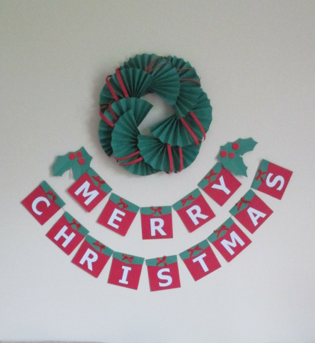

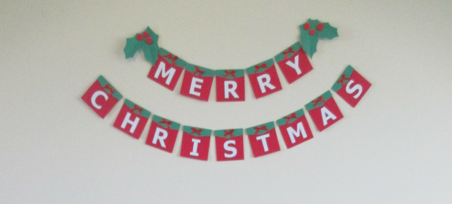
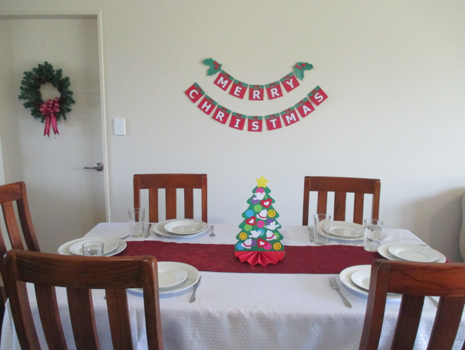
This “Merry Christmas” swag shouts a cheery greeting wherever it is hung. It looks great hung by itself, or paired with a paper wreath or paper Christmas tree. It is very cheap to make since it is made of paper. It folds up flat so it can be stored in a file folder or envelope, which is especially nice if storage space is a concern.
Whether you hang this banner in the dining room, living room, or bedroom, it immediately makes it feel Christmasy. They are fastened onto the wall with mounting putty, such as Fun-tack or Blue-tack. There are 2 ways this swag could be made.
-
1.Download, print, and cut out what is shown above. Lay them in order, then flip over so they are face down, BUT also put them in opposite order or else they will be backwards when you are done. That would be a pity after all that work!! Lay a string across the tops of the back of the letters. Glue a strip of paper over the string on each card. If you are careful to avoid glueing the string itself, you will be able to adjust each letter back and forth once you hang them (which is handy, but not essential.) Tape or glue the ends of the strings to the back side of the letters on each end (“C” and “S” for Christmas) so they don’t accidentally slide off of the string as you attempt to hang the banner.
-
2. Print out letters on your computer. Cut out rectangles from colored paper (You could even use left over wrapping paper.) Glue the letters to the rectangles. Fold the top edge of each rectangle to the front or back to make a channel for the string. In the photo above, I cut green flaps that I glued to the backs for the red rectangles, and then folded over the fronts of the letter cards. I tied tiny red bows and glued them to the green flaps. Cut out green holly leaves and red berries to slide onto the ends of the string on the “MERRY” cards. If you decide to glue on buttons or other embellishments that have thickness, be careful how you store the banner, or it could wrinkle and warp the paper for next year. If you prefer to just throw it into a file folder for storage, make sure any embellishments are flat.
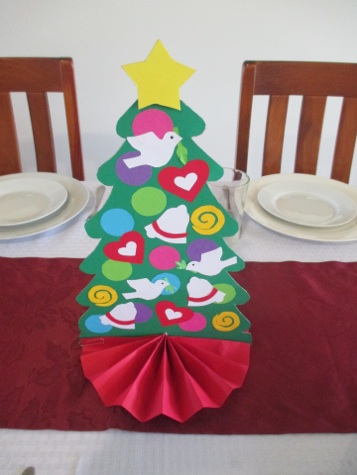
This cute little Christmas tree makes a great centerpiece, or a decoration for a kid’s room. It stores flat, so if you live in a small apartment, you don’t have to worry about precious storage space filling up. There are 2 ways to make this tree.
-
1.Download and print out the front and back of this Christmas tree. Glue the front and back to a piece of thin cardboard such as poster board, or the front of a large cereal box. Lay books or other heavy objects on top until the glue dries so the cardboard doesn’t warp. Cut around the outline of the tree on the front side. The back side has green extending beyond the outline so that if the front and back are not lined up perfectly, it shouldn’t be a problem. Cut out a yellow star and glue to the top. Make the base by glueing two sheets of red paper end to end. Fold it accordion style. Slide the folded red paper into the slit on the bottom edge of the Christmas tree. Spread out both sides and fasten them together with paperclips.
-
2.Cut the front off of a large cereal box. Use this thin cardboard to make the tree. Glue green paper to the front and back of the cardboard. Lay books or other heavy objects on top until the glue dries so the cardboard doesn’t warp. Cut a tree shape out of the paper covered cardboard. It doesn’t have to have branches--it can just be a triangle. Cut a half inch slit in the middle of the bottom edge of the tree to hold the base. Cover the tree with Christmas stickers to represent tree ornaments. Circle stickers will look like ball Christmas tree ornaments. Cut out a yellow star and glue to the top of the tree. Make the base by glueing two sheets of red paper end to end. Fold it accordion style. Slide the folded red paper into the slit on the bottom edge of the Christmas tree. Spread out both sides and fasten them together with paperclips.
“Merry Christmas” Swag
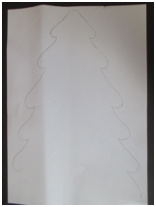
When cutting out letters and leaves, be sure to cut an extra inch (2 cm) flap of plain white paper above them so that there is paper to fold over the string and glue in place.