Seasons > Autumn > Home Decorations > Thanksgiving candy cups, and Centerpieces > Paper Plate Thanksgiving Turkey Candy Cup
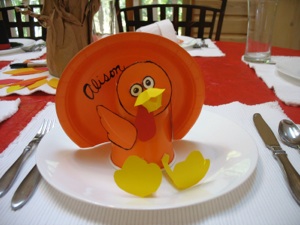
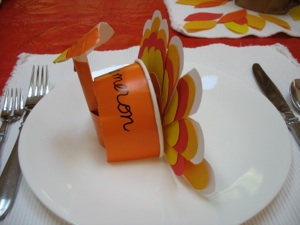
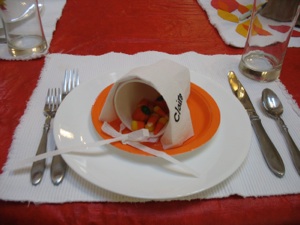
Once the turkey is assembled, fill the remaining half of the cup with candy or nuts and place the cut portion of the cup back over this sideways to form the body and wings. Write a name on this back or on the turkey’s front. (the back is easier for guests standing near the table to see, but the front of the turkey would have been a better choice for the photo...oh, well.)
You could leave the tail feathers off, and provide pens so each guest can write things they are thankful for on the feathers, then they can each assemble the tails of their own turkey.
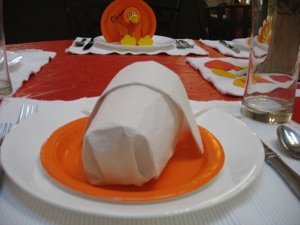
Once the turkey is assembled, turn the cup right side up, fill with candy or nuts, put a small plate on top, and turn upside down. Write a name on the tail or stomach.
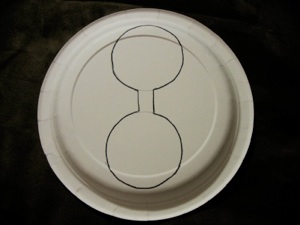
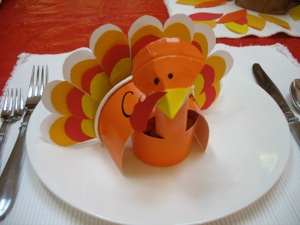
To make the turkey, cut the bottom half inch or so off of an orange paper plate to represent the tail, and tape it to an upside down cup for the body.
Make a buckle by cutting a square out of thin cardboard such as a cereal or cracker box. Cut an “X” in the middle of the buckle with a box cutter and bend the resulting triangles to the back. You should now have a cardboard square with a square hole in the middle. Cover it with tinfoil. Glue the buckle to the hat.
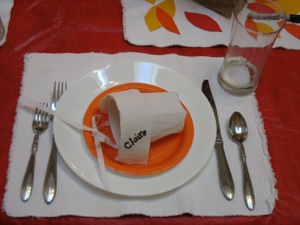
How to make a paper cup pilgrim bonnet
Put a paper cup on its side, and lay a paper towel over it. Fold the front twice to form the front “flap”of the bonnet. Cut the paper towel to fit so both sides of the “flap” just rest on the plate.
cup bottom
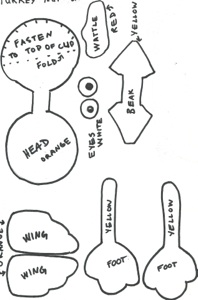
head
wing
wing
I cut the head, and wings out of another paper plate so the colors would match, but colored paper in a similar color, or contrasting color works, too. The bottom of the cup is white, so I cut one circle to cover that, and the other circle to be the head. I used the bottom of the cup as a pattern. Fold where the orange dotted line indicates.
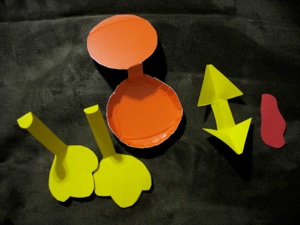
Cut feet out of yellow paper and glue on the cup. Cut the beak and fold it in half lengthwise so the sides of the beak are not flat. Unfold and glue the middle part of the beak (between the two triangles ) to the face. Fold the top and bottom beak together and adjust once it is glued to the face. Cut out a red waddle and glue next to the beak.


head
cup bottom
To make the turkey, cut off the top half of an orange paper cup, being sure to leave about an inch wide neck. Use the cut off part to form the body and wings.
Bend the neck around a pencil to make it round. Cut The head out of orange paper or an orange paper plate--the shape is sort of a heart shape, but without the “V” cut into the middle of the rounded top. Curl the edges of the head a bit with your fingers or scissors to make the edges of the head rounded, and fold the pointy end to form the beak. Glue or tape the head to the top of the neck so the beak is tipping down a bit. Cut a yellow beak and glue on, and draw eyes with a permanent marker. Cut out a red paper waddle and glue next to the beak.
Cut tail feathers from 4 different colors of paper, about an inch wide and 3 inches long. Round one end. Rather than cutting each color a different length, I stacked 4 colors together and cut them all the same length. Then I spread each stack (one feather with 4 colors) so each color showed, and taped them on the back. I made 9 feathers, but you could make a scrawny turkey with 5 feathers. Cut 2 circles from a paper plate and use a brad to fasten to the back of the turkey’s cup body (opposite side from the neck.) If you don’t want to buy paper plates, cut the 2 circles from a cereal box and then cover it with a circle cut from orange paper. Make sure the back layer of the tail feathers are orange, or the back looks unfinished (note the white feathers in the photo! Oops!) Slide the 9 tail feathers between the two orange circles to form the tail.
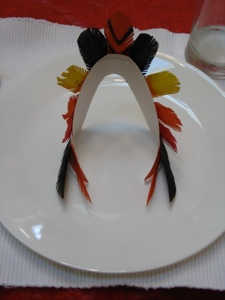
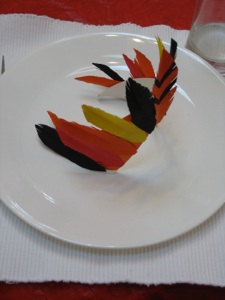
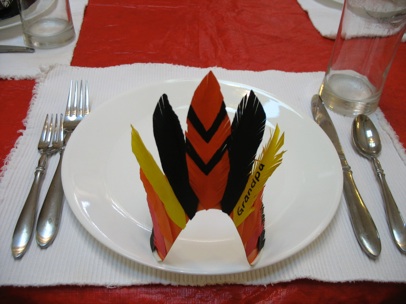
Turn a paper cup upside down and cut an upside down “U” from the front. Be careful not to make the sides of this cut go back too far, or the Indian headdress will fall forward rather than stand. So keep testing it as you cut to make sure it can stand.
On the back side of the cup, cut a slit up the from the drinking lip of the cup all the to the bottom. Cut the whole bottom off of the cup, and curve the sides down to the two cut sides.
Cut feathers from different colors of paper. If you want them to look more feather-like, fold each feather in half and cut slits along the edge. You can cut several feathers at once this way--lay 3 to 5 sheets of paper together, fold, cut a curved line, then cut the slits before unfolding and pulling apart. Glue the feathers to the cut cup and write a name on one of the feathers.
Tape the sides of the paper towel behind the front “flap” to the cup. Fold a few gathers in the back, and tape to the cup.
Cut narrow strips of paper towel to form the tie in the front. Tape the ends to the cup and tie in a bow in the front. Fill the bonnet with candy or nuts and write a name on the bonnet.
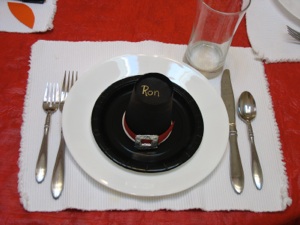
Paper cups have white bottoms. So, if you don’t want the top of the hat to be white, cover it with a black circle of paper. Another option is to buy black plastic cups (which have black bottoms, but are quite large) and cut them shorter to form the top portion of the hat.
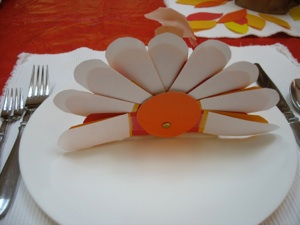
How to make a paper cup and plate Pilgrim hat
Turn a black cup upside down onto a black plate. Add a ribbon or strip of paper.
To fill the hat with candy, turn the cup right side up, and put the plate (hat brim) on the plate, and turn them both upside down.


cut
fold
fold
fold
fold