


Seasons > Easter > Decorations for the home > Living Room and Dining Room > List of items explained > How to make a cross
Seasons > Easter > Decorations for the home > Living Room and Dining Room > List of items explained > How to make a cross
How to Make a Wooden Cross
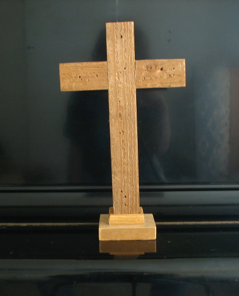
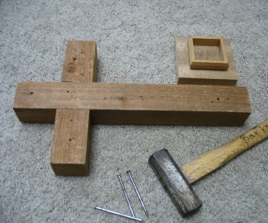
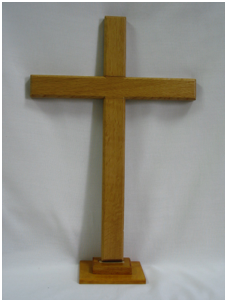
Crosses can be expensive to buy, but if you are not afraid to use a saw, they are not too hard to make. If you look closely at crosses, they are usually made from two vertical pieces, and one horizontal piece (as pictured on the left.) However, if you don’t have a table saw, it is hard to get exactly straight cuts--which is essential to keep it from standing crooked. So I made the cross on the right with two horizontal pieces and one vertical piece (fewer straight ends needed!). I just made sure that the bottom of the vertical piece used the pre-cut end it was sold with. Having a straight bottom is not so important if it is a hanging cross--for that, it is more important to get the hook in the exact center, or it will hang crooked (very annoying!!) Once you have cut the wood, glue the pieces together with wood glue. Let it dry, then sand it. Finally, stain and varnish it-- the more coats, the shinier it will become. Or, as in the cross on the right, it is left in it’s rough cut state--unsanded and unstained. NOTE: if you are a perfectionist, it will look more professional if you sand all the edges to make a beveled edge.
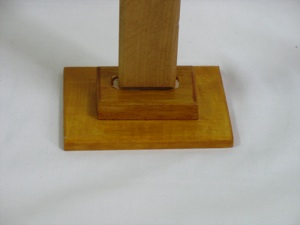
Standing crosses are hard to pack between seasons because of the bulky base. For this cross, I cut molding and glued it to a square base. I just set the cross in it’s base, and gravity holds it in place. The molding will look best if it is miter cut (cut at an angle so each corner comes to a point.)
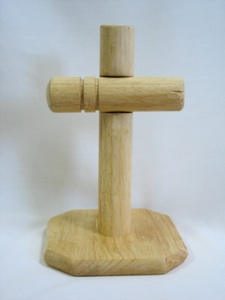
A base for the cross looks better with two squares of wood stacked on top of each other, than just one square by itself. Glue the cross on top of the base. You will need to prop up the cross to keep it straight until the glue dries. A cross is such an odd shape that it takes creativity to find items that will do this job! You could screw the pieces together instead of gluing them, but it is MUCH more complicated. See note below.
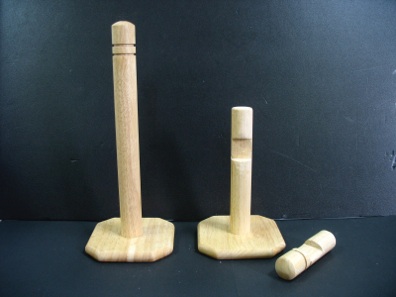
I made this cross out of a paper towel stand from a dollar store ( hundred yen store.) I was trying to figure out a way to make crosses for one dollar (100 yen) or less. It all comes apart (the base unscrews and the cross piece comes off), so it does not take up much storage space. I cut the top third of the dowel off and put a notch in both sides. For a taller cross, buy 2 and cut the cross piece from the second rack--a $2 cross is still pretty inexpensive!
Three Kinds of Bases
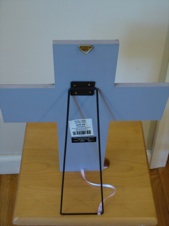
Another way to make a stand is to fasten a metal channel to the back of the cross, then bend a coat hanger or other stiff metal to form the stand that will fold flat for storage. Note that the stand has a ribbon to keep it from going too far back, and falling flat. Another option, instead of a wire stand, would be to fasten a strip of wood on with a hinge.
Notes about screwing a cross together:
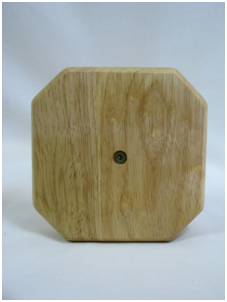
The screws need to be long enough go all the way through both base pieces and into the cross. Without a drill press, this is pretty hard to do because it is so hard to screw the screw in straight, so there is a very good chance the screw will go out the side of the cross. If you drill a hole first, it can help avoid the wood splitting, but you have the same problem of getting it crooked. If you do manage to get the screw in without any problems, it is best to have 2 screws so the cross doesn’t spin on the base. One more point about screws--the heads will probably scratch your furniture unless you either countersink the screw (drill a shallow hole to accommodate the head of the screw--see photo above) or glue felt over the whole base so the screws don’t scratch any tabletop. So, if you don’t have the right equipment, it is WAY easier to glue the cross together. You can always re-glue it if it comes apart.
Easter Decorations for the Church > How to make a cross
Easter Decorations for the Church > How to make a cross