


Sunday School or Bible Clubs > Crafts > “God’s Gifts to Christians” Activity Sheet for Middle School


How to Fold:
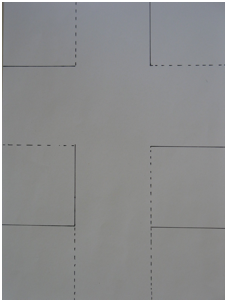
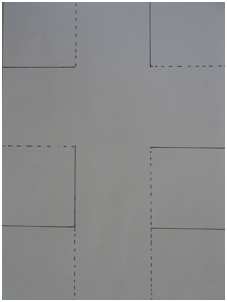
Once the solid lines have been cut, there is only one direction each square can be folded. But, just in case you want to know, fold the flaps as shown by arrows on the photo to the left. All flaps fold over the central column, except the square below the left arm folds up, and the square over the right arm folds down.
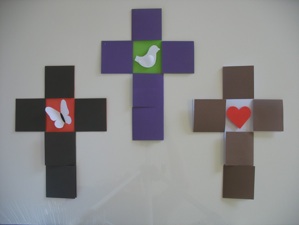
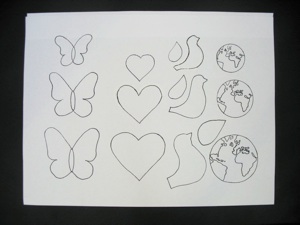
Decorative elements to embellish the middle square of the cross
You can decide which item the students will put on their crosses, or you can let the students choose. Save time by cutting these decorative items out ahead of class, or let the kids cut them out during class, if time allows. I have provided different sizes so that it can fit no matter what the size of paper you use. The largest size works with A4 paper. This decoration is totally optional, so if you decide not to do it.
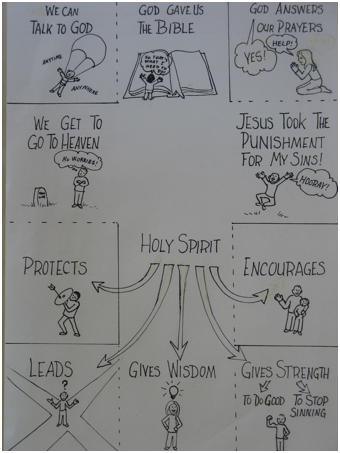
What the pictures represent:
-
1.Butterfly: just as a caterpillar changes into a beautiful butterfly, a person also changes from a sinner to a Christian when they believe in Christ for salvation.
-
2.Heart: this represents Christ’s love for all people all over the world. He loved each person enough to die on the cross for us.
-
3.World: God loved the world (all people) so much that he gave his only son to die in our place. Before Jesus went back to heaven, he told the disciples to go tell everyone about salvation through Christ (the great commission)
-
4.Dove: represents the Holy Spirit who comes into each Christian’s life to give power to overcome sin
Sunday School or Bible Clubs > Crafts > Cross Activity sheet for Middle School
How to Make a Blank Cross/Gift Sheet without download
-
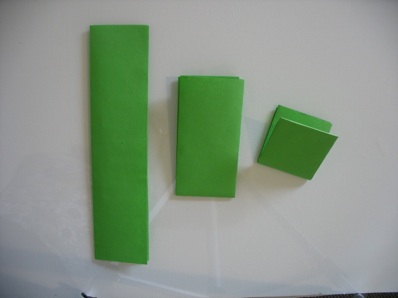
1.Fold a sheet of paper in thirds the long way.
-
2.Fold this long thin folded sheet in half, then again in half.
-
3.Open the folded sheet all the way flat. There should be 12 squares--4 rows and 3 columns.
-
4.The cross shape is made from the center column of 4 squares, and second row down from the top which forms the arms of the cross. The rest of the squares will fold over that column and row to form the cross.
-
5.Cut between all but 2 of the squares in both outside columns--no cuts should go into the central column. In order to make flaps that will fold over the arms of the cross, one needs to fold down, and the other needs to fold up.
6 Ways to Use Cross Sheet
Fold each cross down to a single square. Tie a ribbon around each square to make it look like a “gift.” In class, pass out one to each of the students. Explain that when Jesus died on the cross, he gave many gifts to each person who believes in him. Tell them to open their gifts to see all the amazing things Jesus has given them (or will give them if they believe.) It can simply be a reminder of some of the things they have in Christ, or it can be turned into an activity. Here are some options to make it into an activity:
-
1.Students fill in their own crosses--Pass out blank crosses to the students. Use a cross with words as an example to get them started so they understand the kinds of things to write in the squares. Tell the students to fill in the squares with their own lists, but they can use as many of the ideas on the sample as they want.
-
2.Make the activity into a game--Divide the students into groups, and give each group a blank cross. Tell them to fill in the squares with things Jesus has provided for all Christians. Give points for each idea that matches the sample cross (don’t show it until after they have written the ideas.) Optional: if this seems too easy for your students, give points for original ideas instead of matching ones.
-
3.Get the kids to think what it would be like if we didn’t have these gifts. Divide the kids into groups. Give each group a filled in cross, and a blank cross. Tell them to fill in the empty cross with what it would be like if Jesus had not died on the cross and risen again.
-
4.Students draw pictures of stick figures to match the gifts: Pass out filled in crosses. Tell the students to draw stick figure pictures on the outside flaps to match the words inside. Since there are two gifts per flap, they will have to choose one to draw on each flap. Optional: make it a group activity, and each student draws just one picture.(optional: draw on separate paper, then glue or tape all the pictures to the group’s cross.)
-
5.Play charades: tell the students to act out mini skits that demonstrate one of the gifts, and everyone tries to guess which gift they are acting out. This can be done 1) as a whole group, or 2)divide into teams to compete, or 3)have each group act and guess within the group.
-
6.If you want your students to focus more on their sins and repentance, pass out blank cross sheets that have been pre-cut. Tell the students to write sins they have committed in each of the 12 squares. To help them think of options, first have the whole class come up with typical sins their friends commit, and write this list on the board. Then kids can choose the sins that fit their situation. Another option would be to write various sins in large letters on pieces of paper that are hung on the walls around the room. After they have filled in their own crosses with sins, tell them to fold the flaps on the dotted lines, and after they see the resulting cross shape, remind them that Jesus died on the cross in their place so they can escape the punishment for sin that they deserve. Give them time to pray a prayer of repentance alone in silence. Now tell the students that those sins have been forgiven, so tell them to write forgiven on the outside of each flap. They can take these home as a reminder, or you can extend the activity by burning them (outside, of course), or tearing them up to graphically depict how these sins are no longer held against them.

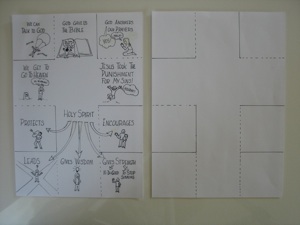


How to Fold:
Once the solid lines have been cut, there is only one direction each square can be folded. But, just in case you want to know, fold the flaps as shown by arrows on the photo to the left. All flaps fold over the central column, except the square below the left arm folds up, and the square over the right arm folds down.
Fold each cross down to a single square. Tie a ribbon around each square to make it look like a “gift.” In class, pass out one to each of the students.
Tell them to open their gifts to see all the amazing things Jesus has given them. Each “door” opens to show two gifts from God.
Download the sheet with words and pictures (see enlargement below), or download a blank sheet and let them make their own lists of gifts from God.