“He is Risen!” Booklet
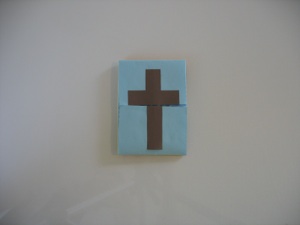
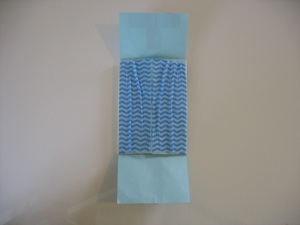
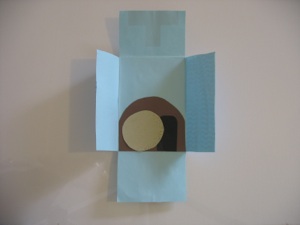
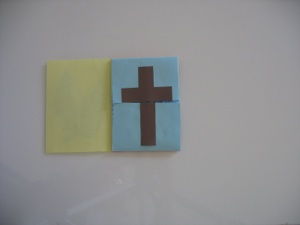
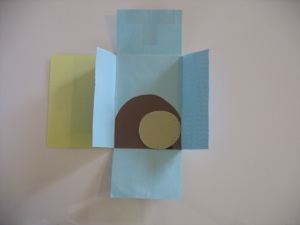
This booklet opens a different direction for each layer to reveal the Easter story. The first picture is the cross. The top and bottom open to reveal the torn temple curtain that was torn from top to bottom when Jesus died, to symbolize how we no longer have to go through a priest to talk to God. The curtain opens in the middle, to reveal the empty grave. The stone rolls away on a brad.
Teacher Preparation:
-
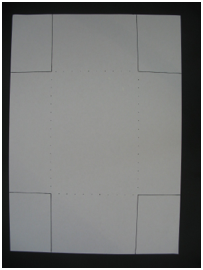
1.Print out one background sheet per student.
-
2.Cut off the 4 corners as marked by solid lines on the sheet.
-
3.Fold on the dotted lines (only if you want to save time in class, otherwise, leave it for the students to fold in class.)
-
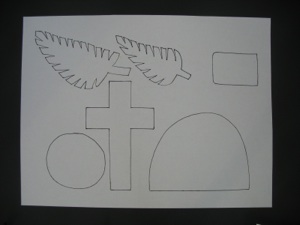
4.Cut out a brown or black cross for each student (use the downloadable pattern sheet, or make your own pattern.)
-
5.Cut a grave, stone and doorway for each student (use the downloadable pattern sheet, or make your own pattern.)
-
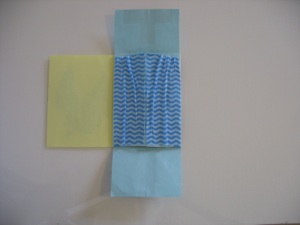
6.Cut a fabric scrap or patterned paper to fit the middle square of the sheet of paper. This will form the temple curtain. Cut a notch in the middle of the top of the cloth or paper to make it easier for the children to tear.
-
7.Poke a hole in each grave and stone for a brad to go through.
Give the children the prepared materials. Assemble the craft in this order:
-
1.Glue grave to middle square of paper.
-
2.Glue a black doorway onto the grave.
-
3.Fasten the stone on with a brad.
-
4.Fold the 2 side panels into the middle to form the temple curtain layer.
-
5.Tear the curtain cloth or paper and glue the torn pieces to the folded panels.
-
6.Fold the top and bottom flaps to the middle.
-
7.Glue the cross to the top and bottom flaps.
-
8.Cut the cross between the flaps.
If this takes too much time for your class, do some of these steps before class as part of the preparation, or spread it out over more than one lesson..
How to make your own pattern for the background sheet with any size paper, instead of downloading:
1. Mark the middle point on both the long and short ends of a sheet of paper.
2. Fold the ends to the middle of the sheet in both directions (long ends and short ends.)
3. Open the sheet and cut off the 4 corners on the fold lines. Use this as a pattern to cut one for each student.
Sunday School or Bible Clubs > Crafts > “He is Risen” Booklet
Cross: Jesus died for our sins
Torn temple curtain: we no longer need a priest to go into God’s presence (pray)
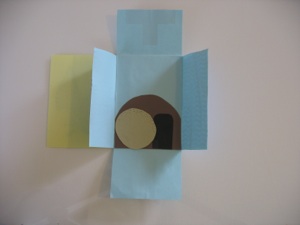
Empty grave: Jesus rose from the dead on the third day to free us all from sin. Fasten the stone on with a brad so the stone can be rolled away from the grave.
How to add the two extra pages
-
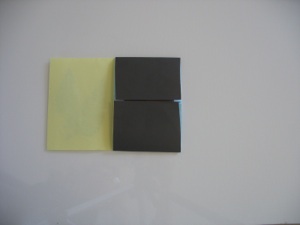
1.To represent the day becoming dark when Jesus died, make black flaps to cover the cross. The booklet should be completed through the steps described above. Now, cut a sheet of black paper in half the long way. Cut one of these half sheets in half (the short way--so you have 2 quarters of the full sheet ) and cover the front of the booklet--the flaps that have the picture of the cross on them. Fold any excess black paper to the back and glue onto the back ONLY. You might think that you could just use the half sheet to wrap around the booklet, but because of the extra layers it has to go around, it is not quite long enough to completely cover the cross.) To tell the story, fold the black flaps to the back, then when you get to the part about the day growing dark, fold the black flaps forward to cover the cross. Then be sure to open both the black flaps and the flaps with the cross to reveal the temple curtain.
-
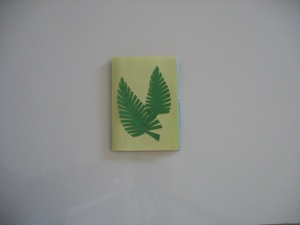
2.Make a cover from a different color of paper--Cut one half sheet per child. Glue the back half of this sheet to the back of the middle square. Decorate the cover. In the photo, there are palm branches to represent when Jesus rode into Jerusalem on the back of a donkey, and the people shouted, “Hosanna!” and waved palm branches. Feel free to come up with your own design for the cover, or let the kids design their own. You could have a picture to represent the last supper--if you want a pattern for this, download my paper resurrection eggs, print and cut out the picture of the bread and wine, and photocopy it onto the half sheets of paper that will form the cover.
Add two more layers to the booklet
If time allows, or if you want to do the craft over several weeks, you can add 2 more layers: a cover, which can represent Palm Sunday , and black flaps to represent when the sun turned dark when Jesus was on the cross.
Cross: Jesus died for our sins
(pull the black flaps forward from behind the back of the booklet to cover the cross with the black flaps.)
Palm branches: Jesus rode into Jerusalem on a donkey, and all the people shouted, “Hosanna!” meaning “Saves!’ (open like a regular booklet.)
Black flaps: The sun turned dark while Jesus was on the cross. (open both layers of top and bottom flaps to reveal the temple curtain.)
Move the stone away from in front of the grave entrance: an angel moved the stone to reveal that Jesus was no longer dead.
Torn temple curtain: we no longer need a priest to go into God’s presence (pray)
(open the curtain from the middle torn place to reveal the grave.)
Empty grave: Jesus rose from the dead on the third day to free us all from sin
Sunday School or Bible Clubs > Crafts > “He is Risen” Booklet