

Sunday School or Bible Clubs > Crafts > Christmas trees and wreaths


Christmas Tree Banner
-
1.Cut background felt. This can be tiny (4 inches wide) up to this size (1 foot wide.)
-
2. Cut tree out of green felt. This can be a straight triangle (best for large classes since it is simpler to cut out) or with bulges along the edges representing branches. (You can cut 3 or 4 at a time to cut down on preparation time.
-
3. Provide sequins, rick-rack, beads, ribbons and lace for children to glue on.
-
4. Fold top edge of the background felt to the back and glue a hem for a dowel to go through. Inexpensive things to use as dowels include plastic drinking straws, bamboo skewers, pencils, disposable chopsticks. These look especially nice with wooden beads on the ends.
Ice Cream Cone Christmas Tree (and Cookie House)
-
1.Provide green icing for children to put on inverted ice cream cones.
-
2. Provide small candies to decorate the tree (these are mini m’n’m’s sold in plastic tubes, and tiny fruit flavored candy balls sold at most grocery stores.
-
3. For the house, cut 5 square cookies (2 whole for the roof, one cookie cut in half for the two sides, and 2 cookies with a peak for the front and back.
-
4. Help the children “glue” the house together with icing, then glue more candy on the house for decorations. Windows are yellow icing.
Cookie Christmas Tree
Make and bake sugar cookies. To make it quick for making lots of cookies, after you roll out the dough, cut it into triangles with a knife. Bake in rows alternating the direction of the trees to fit as many on the cookie sheet as possible.
Provide green icing, sprinkles and small candies for the children to decorate the trees.
As an alternative, use a donut cutter to make wreaths instead.
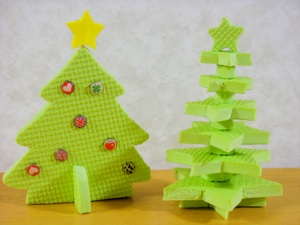
Foam Floor-Mat Christmas Trees
-
1.The tree on the left is definitely the quick one. Cut one per child along with a base with matching notches so they slide together. Let the children decorate the tree. The one here is decorated with tacks that have designs on them.. This substance is not hard to cut, but it is hard to make nice looking corners, so a straight triangle for the tree is going to be much easier to make than the one shown.
-
2. The Tree on the right is a lot more work. Cut 7 stars in descending order, and have the kids glue it together with scraps in between layers (it ends up too short and squat without the layers in between the stars.)
-
3. Both these designs could also be made out of cardboard. One way to color the cardboard would be to glue on tissue paper--either flat, or scrunched up. Air drying clay such as Hearty would be an alternative method.
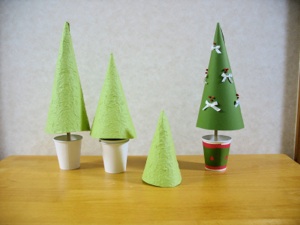
Paper Cone Christmas Trees
-
1.Cut a half circle out of paper. (various colors of paper are sold at some 100 yen stores.) Form paper into cones and fasten with glue or double stick tape. Birthday party hats sold at some 100 yen stores could be used in place of this.
-
2. Provide beads, sequins, lace, ribbons, or paper cut outs to decorate the tree.
-
3.. If you want a base, buy paper cups, dowels, and heavy air drying clay (Kaminendo.) Push a ball of clay into the bottom of the cup, and poke the dowel into the clay. Leave till dry.
-
4.Rest cone on top of dowel. (because of this, when making the cone, it should not have a hole in the top, or it will slide right down the dowel.
-
5.You can buy pre-decorated cups for the base, or you can make your own by cutting out colored paper and gluing or taping it on. (Tear apart one cup to form a pattern.
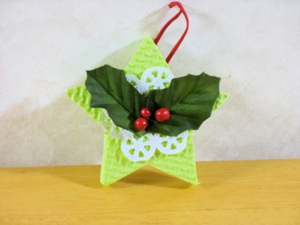
Foam Floor-Mat Star
-
1. Cut out one star per child.
-
2.Provide decorations for the children to glue on, such as paper doilies, paper leaves, red beads or clay balls made of Sculpy or air drying clay such as Hearty. (Karui Kaminendo)
-
3. This design could also be made out of cardboard covered with tissue paper or paper towels and glue, or air drying clay such as Hearty. Cut clay with a star shaped cookie cutter, sold in many 100 yen stores. Some even come in sets of several sizes, so the children can choose a size that fits his or her Christmas tree at home.
-
4.Provide ribbon or thread to make a loop to hang star from. This can be glued to the back, or put on a needle with a big eye to poke it through the soft foam. Be sure to tie a knot close to the star and then again at the end of the ribbon, or the star will hang crooked on the tree.
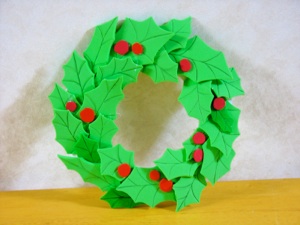
Foam Wreath
The wreath shown here is made out of EVA foam, but it can be made out of felt or green paper if you cannot find a source to buy foam (sold in some 100 yen stores and craft stores.)
-
1.Cut a ring base for each child. Cardboard boxes are free, if you can get them at grocery stores near you.
-
2. Cut green holly leaves and red berries. If you don’t feel confident of cutting holly leaves, many hundred yen stores sell holly leaf cookie cutters in sets with two sizes. Draw around that to make a paper pattern. If you don’t have time constraints, you can give the children paper patterns and let them cut their ow leaves out.
-
3. Have the children glue the leaves and berries to the ring. If they overlap the leaves well, and only glue one end down, it will look more realistic than if they glue everything flat. If the leaves are made of paper, folding them in half down the middle and then opening again before gluing them will make them not lie flat, and so look more three dimensional.
-
4. Optional: if you like the look of veins on the leaf, they can be drawn on with a toothpick or green pen. Draw one line down the middle, the draw curved lines from each point to the middle.
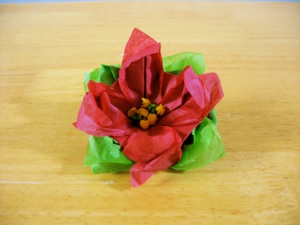
Tissue Paper Poinsettia
-
1.Cut one sheet of green tissue paper and one sheet sheet of red tissue paper in exact squares.
-
2.For each color, fold all 4 corners to the center, then turn it over so top side has no folds, and fold those 4 corners to the center. Tape or glue the center points down on the top side only. Now pull the point from underneath so there are 2 layers of petals all the way around.
-
3.Tape or glue the red flower on top of the green leaves.
-
4.Tear bits of yellow tissue paper and roll them into little balls and glue them in the middle of the red flower, or fasten them with double stick tape.
-
5.This can be a decoration on it’s own, or it can be fastened to a wreath, such as the tissue paper wreath to the right.
-
6. If you can’t find tissue paper or paper napkins in these colors (many hundred yen stores sell the red and yellow tissue paper in packs of pre-folded tissue paper for making pompom flowers in the paper/stationary section) then you can use white paper towels to fold, then paint with water colors.
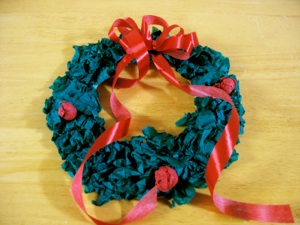
Tissue Paper Wreath
-
1.Cut one cardboard ring for each child.
-
2.Provide green tissue paper for them to tear of small pieces to scrunch up and dip in glue, then fasten to the wreath.
-
3.Provide red tissue paper to tear off and scrunch up into balls (berries) to dip in glue and put on the wreath.
-
4.Tie a bow on the wreath, or make a poinsettia (like the one on the left) to decorate the wreath.
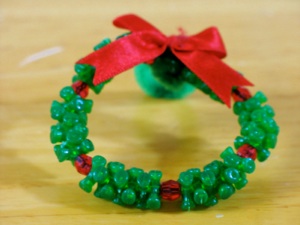
Bead Wreath
These wreaths are inexpensive sets sold through Oriental Trading company. They are simple to make without a set if you can find similar beads in stores near you.
-
1.Push green and red beads onto a red pipe cleaner (chenille wire) and twist the ends together, then shape the pipe cleaner into a bow. Alternately, cut off the ends of the pipe cleaner once they have been twisted together, and glue a ribbon bow onto them
-
2.The wreath shown alternates 7 green beads and one red one.
-
3.This can be used as is to hang in a window or on a Christmas tree. You can also glue a pin-back to the back to make it into a Christmas pin, or glue a magnet to the back to make a refrigerator decoration.
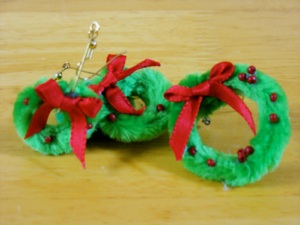
Pipe Cleaner Wreath Pin and Earrings
-
1.Cut a pipe cleaner (chenille wire) with long “hair” to the size you want it and shape it into a ring. Bend the ends to the back.
-
2. Glue small red beads and bows to the wreath.
-
3. To make it into a pin, glue a pin back on the back side of the bow. The beads are easier to glue on if you use tweezers.
-
4.To make earrings, fasten a bead wire around the each wreath before gluing the bow on, and fasten the top end of the wire to earring wires or posts.
-
5.Since these are just pipe cleaners, they are easily misshaped when they get bumped, etc. When that happens, just bend it back into shape.
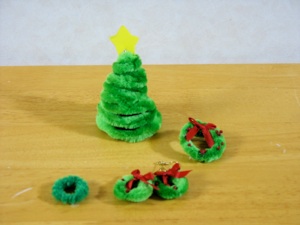
Pipe Cleaner Tree and Wreath
-
1.Shape a pipe cleaner (chenille wire) in a spiral to form a tree. This will probably be easier if you make paper cones for the children to bend the wire around.
-
2. Cut a small paper or foam start, glue to a toothpick and put the toothpick into the top of the tree.
-
3. For a much sturdier pipe cleaner wreath (shown in the photo above, on the left) wrap a short “haired” pipe cleaner around a bottle ring (the kind that is left on coke bottles or vanilla bottles when the lid is screwed off.)
-
4. Glue a bow on the front and a pin back on the back.
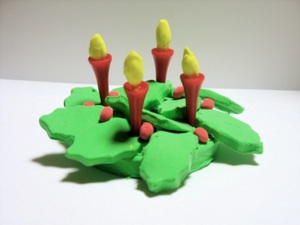
Hearty Advent Wreath
This is a safe advent wreath that small children can “light” each week by placing a flame on another “candle.” Usually advent wreaths are made of fresh greenery, and one more candle is lit every Sunday leading up till Christmas--one candle is lit on the first Sunday, two are lit on the second Sunday, 3 are lit on the third Sunday, and 4 are lit on the fourth Sunday.
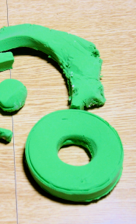
1. Roll out green clay fairly thick and cut into a ring. A donut cutter makes this really simple. (Clay and donut cutter are sold at some 100 yen stores.)
-
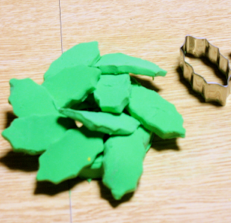
2.Roll out green clay much thinner and cut out holly leaves. Some hundred yen stores sell these in sets with two sizes.
-
3. Rub water onto the wring and gently press the leaves onto the ring so the leaves overlap each other.
-
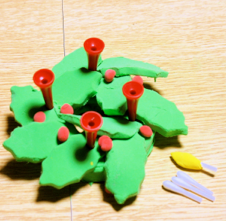
4.Roll red clay into little balls, rub them with a bit of water and press them onto the wreath.
-
5. Poke 4 golf tees into the clay to form candles.
-
6. Cut 2 Q-tips in half and cover the cotton end with yellow clay. Put a“flame” into each candle.
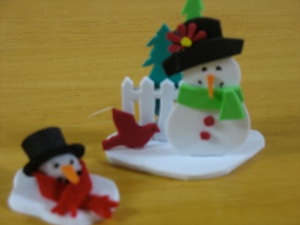
Foam Snowman
-
1.Cut White foam to form a base and the snowman.
-
2. Cut green trees, black hats, orange nose, etc.
-
3. Glue together.
-
4. For the melting snowman, wrap a small strip of felt around his neck to form a scarf.
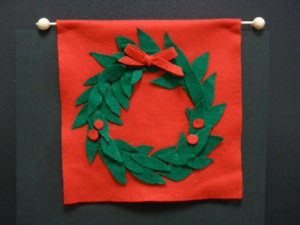
Felt Wreath Banner
-
1.Cut red or white felt for the background.
-
2. Cut lots of green leaves.
-
3.Cut several circles out of red felt to make berries, and a long red strip to tie into a bow.
-
4.Draw 2 circles on each background felt so the children know where to glue the leaves (and so that the wreath will turn out round!)
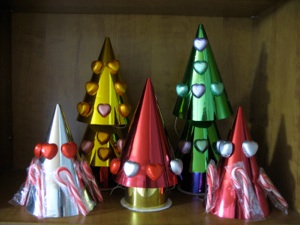
Birthday Hat Christmas Tree
-
1.Glue wrapped candy to birthday hats to decorate the “Christmas trees”. Double stick tape could be used instead of glue.
-
2.Alternative: cover hat with plastic wrap and “glue” unwrapped candy on with icing.
-
3. Use a star shaped cookie or lollipop on the top, or cut out a paper star, glue to a toothpick and stick the toothpick into the hole on the top of the hat.
Hint: If you can’t find inexpensive party hats, cut half circles out of poster board, roll into a cone shape, and staple in place.